

Titanium backup pro apk xda Activators Patch - draw?
Tools
Photoscape X Pro 4.2.1 Crack + Keygen [Latest 2022] Photoscape X Pro 4.2.1 Crack is photograph-enhancing software formally permitting your pictures in partitioning in an effortless method. Photoscape Crack is an enjoyable and simple image modifying system. I enjoyed this picture, audience, publisher, cutout, covering, screenshot, and so on. Produce your personal style by offering … Read more
Rooting
Daytona
Questions? ask here
Droid X2 Support
INFO 2.2.2/ 1.2.1482.3.3/1.3.2322.3.4/1.3.3802.3.5/1.3.418
All OTA updates zips NA2.3.3/1.3.2322.3.4/1.3.3802.3.5/1.3.418
SBF (firmware)2.2.2/ 1.2.1482.3.3/1.3.2322.3.4/1.3.380 2.3.5/1.3.418
Android version:2.3.5
Baseband version:N_03.13.31P
Kernel version: 2.6.32.9-00008-gc406305 hudsoncm@il93lnxdroid80
2.3.5 about phone screenshot
2.3.4 about phone screenshot
Quick Links
General
Websites/ Forums
Concepts & Vocabulary
Verify that your download is complete with MD5/SHA-1 Hash Checksums
[How To] Use ADB
backing up contacts/ contacts not syncing
APN Settings
Apps
General Droid X2
Motorola DROID X2 specs
[HOW-TO]- VIDEOS for Droid X2by Tomsgt123
Can’t text, sync, or download anything from the play store
Stock Rom
moto driversMotorola_End_User_Driver_Installation_5.9.0
Intalling drivers/ Driver issues
sbfs (Firmware)
all-in-one ezSBF DX2 2.3.4 with zergrush root option /Dev-Host mirror
How To Flash a SBF/ (stock rom) Using RSD Lite
Rooting
[How To] Root 2.3.5/1.3.418 Magic MD5 Method
Before Rooting
Root with...
After Rooting
Installing V6 Supercharger on Motorola running Gingerbread Rom
Custom Roms
before you install custom rom
List of Gapps Links
Repair
Archive
Before Rooting you should
1. Download SBF files (a or b )
a. all-in-one ezSBF DX2 2.3.4
b. files from How To Flash a SBF/ stock rom Using RSD Lite
2 buy (a or b)
a. Spare Battery Charger for Motorola Droid X/X2ebay linklink 2
b. Motorola Programing Adaptor by Team Black HatMake your own
Root for
2.3.4
Google DrivePete’s Root Tools for rooting 2.3.3 & 2.3.4
XDA[GUIDE]HowTo: Root your Motorola Droid X2 using zergrush (2.3.4)
DroidForumall-in-one ezSBF DX2 2.3.4 with zergrush root option
don’t use zergrush, if you want to update to 2.3.5, or you will have to sbf first.
2.3.5
[How To] Root 2.3.5/1.3.418 Magic MD5 MethodXDADFDXRWPDAS
After Rooting
1. Install Droid X2 BSR/System Recovery or Install BSR or [video] How to use bootstrap recovery
2. backup user data (recommended)
a. backup apps with titanium backup, or rom toolbox
Open Titanium Backup and press the "Options" hard-key. Then press "Batch." Run the Backup all User Apps tool and wait for the process to complete.
b. backup texts and call log with sms backup +
c. verify thatcontacts are backed up/ synced
d. NandroidHowTo: Perform a bootstrap (or nandroid) backup and recovery of X2
Install BSR and make a Nandroid backup
XDA [GUIDE][REF] BLOAT REMOVAL/INSTRUCTIONS UPDATED 8/4/11
XDA [GUIDE]HowTo: Perform a bootstrap (or nandroid) backup and recovery of X2
Droid X ForumsInstall BSR and make a Nandroid backup
XDA [MOD]Droid X2 BSR/System Recovery + InstructionAPK:Mirror 1Mirror 2Mirror 3
You Tube[Video]How to use bootstrap recovery
Google DrivePatched BSR for CM7 cm9 cm10...
XDA [MOD][RECOVERY]- ReRecovery for a safer Bootstrap
You Tube[Video]How to use Z ReRecovery to save you from a Sbf
XDA[GUIDE]Jelly Bean's Google Now for ICS (FULLY FUNCTIONAL!!)
XDA[GUIDE][MOD]GingerBread Battery Fix v0.8( Peppermint battery fix)
DroidForum3GTurboCharger, V6 Supercharger And 98KickAssKernelTweaks By Zeppelinrox
XDA[GUIDE][Mod]Search button as Camera button (key remapping)
XDA[INFO]Help home key and back key flipped
XDA[GUIDE][Project Cheesecake] Need YOUR help!
XDA [GUIDE][GUIDE] V6 Supercharger Cm9 (Updated 07/18/2012
XDA [GUIDE][CM9] Modified services.jar for V6 Supercharger
PD [GUIDE]How to flash Verizon's Droid X2 to Cricket
XDA[LIST]All Droid X2 SBFs and OTA updates
DroidForumall-in-one ezSBF DX2 2.3.4 with zergrush root option
Google DriveHow To Flash a SBF Using RSD Lite
XDA[GUIDE]How to: sbf on linux (and now OSX!written for X2
xda-developersDroid X2 CDT Table
Failed to boot 1 - bootloader/microboot partition problem
Failed to boot 2 - boot partition problem
Failed to boot 3 - recovery partition problem
Failed to boot 4 - system partition problem
Will remain on Gingerbread (Android 2.3).
Eligible for the Motorola trade-up program.
Go tomotorola.com/tradeupto participate
Spare Battery Charger for Motorola Droid X/X2
$10 Motorola Programing Adaptor by Team Black Hat
So you flashed your phone and now it thinks the battery is dead (even though it's not) and it won't let you flash it again to fix it? Or, your battery really is dead and you don't have a way to charge it because your phone is soft-bricked and won't charge the battery. What do you do? With this cable you don't even need a battery in your phone. This isour clone of what is generally referred to as a Motorola "Factory Cable". orHow to make your own Motorola "Factory Cable" orHow/why to make your own Motorola "Factory Cable"
Motorola DROID X2 specs
Motorola DROID X2 - Full phone specifications - GSM Arena
Safe Mode - Motorola DROID X2 MB870
USB Debugging Mode - Motorola DROID X2 MB870
Hard Reset - Motorola DROID X2 MB870 - Verizon Wireless Support
Data Wipe in Android Recovery - Verizon Wireless Support
Memory Card Formatting - Motorola DROID X2 MB870
XDA [GUIDE] to skip activation, use 4 corners method orBoot Android {No BP}
RootJunkyHow to Bypass Motorola Droid X2 activationby Tomsgt123
LJ [GUIDE]Booting Droid X2 into stock android Recovery Mode
xda-developersDroid X2 on pageplus.
MotoMoto X2 page
M [GUIDE]Motorola Verizon Droid X2 User Guide
DX [GUIDE] Common X2 Questions and Answers
RW [INFO]Droid X2 Boot commands
DroidForumSBF File, RSD Lite/Drivers And Instructions Froyo And Gingerbread
XDA [GUIDE] [REF] ROMs, Utilities, Tutorials, Mods (Updated 6-23-2012)
XDA [GUIDE] [REF] Roms, Root, SBF, RSD, Bootstrap, Mods
XDA [VIDEO]How to video's. sbf, root, nandroid backup, and restore
Tomsgt123’s youtube videos
RootJunky[HOW-TO]- VIDEOS for Droid X2by Tomsgt123
XDA[INFO]Class 6 vs. Class 10 SDHC Replacement for Droid X²
1. Root with
2. Install Droid X2 BSR/System Recovery or follow Install Bootstrap
3. Backup user data (user data is wiped from before installing a rom)
a. backup apps with titanium backup, or rom toolbox
press the "Options" hard-key. Then press "Batch." Run the "Backup all User Apps" tool and wait for the process to complete. - clothednblack
b. backup texts and call log with sms backup + or other app
c. verify thatcontacts are backed up/ synced
d. Bookmark Backup
e. Make a Nandroid HowTo: Perform a bootstrap (or nandroid) backup and recovery of X2
4. fully charged battery
5. Install rom with BSR [Video] How to install a custome rom with bsr
6. (optional) [RECOVERY]- ReRecovery for a safer Bootstrap[Video] How to use Z ReRecovery to save you from a Sbf
MOTODX2_Bootstrap_signed.rar (for stock or eclipse rom)
Patched BSR APK for CM7/Cm9/Cm10….
MOTODX2_Bootstrap-CM7-signed.apk-Dev Host
http://www.mediafire.com/?kdtwk653xudkkag
Installing MOTODX2_Bootstrap-CM7-signed.apk
drag and drop apk file the phone
then put phone in Charge Only or disconnect from pc
on phone check allow unknown sources
Menu > Settings > Applications > Unknown sources
open phone's file manager app
navigate to file with phone’s file manager, tap on it, select install
XDA[post]Concise guide to getting CWM working with cm10 A3
Droid X ForumsDroid X2 ROMS
XDA[forum]DX2 Roms
XDA [VIDEO]Different rom videos to see what they look like and some features in them
Gingerbread Roms
Droid X Forums[ROM] Eclipse v2.3
DroidForumEclipse v2.3 (7/25/12)
XDA[ROM][ROM] Eclipse v2.3 (7/25/12)
Dev-Host downloadX2-Eclipse-v2.3.zip
Description: last release 7/25/2012
Dev-Host download X2-Eclipse-v2.2.zip
Description:released 5/8/12 seehttp://forum.xda-developers.com/showthread.php?t=1198857
Dev-Host download X2-Eclipse-v2.1.zip
Description: released 2/27/12, need to sbf to 2.3.4, then install 2.3.5/1.3.412 leaked update, before installing this eclipse version see http://forum.xda-developers.com/showthread.php?t=1198857
DB[ROM] X2-Eclipse-v1.3.zip (flash on 2.3.4) Mediafire Link
137mb Md5 checksum: DA934AF98542D5C66F883C6EAEC52DB9
XDA[ROM]CyanogenMod 7.2.0-RC1 X2 [BETA] - xda-developers(7.1 Gaaps)
Dev-HostCyanogenMod 7.2.0-RC1 X2 [BETA] (Mirror)
Dev-HostMOTODX2_Bootstrap-CM7-signed.apk Patched BSR APK for CM7
XDA[ROM]CM7DX2 WIFI and Dialer fix/mod (enable cron scheduler)!
use gapps-jb-20121011-signed.zip
CM10 Alpha 3 for DX2 mirror
cm-10-20130113-UNOFFICIAL-daytona.zip 149.0 MB
https://mega.co.nz/#!ZRpQQYhS!VKji1TT1PS9EmRCjyHRgMnGCf89VqN1oJkOuxtCNNSk
MD5 Sum: 4ee3969a9f09117f661742470aaba379
XDA[post]Concise guide to getting CWM working with cm10 A3
Google DriveList of Gapps (Google apps)
-----------------------------------------------------------------------------------------------------------------
Nandroid use following Restore Procedure
MF[ROM] Nandroid of Eclipse 2.3 for DX2/(2.3.5)
129mb Md5 checksum: 2B145CD8C90DE8F6ED6EB409F97
--------------------------------------------------------------------------------------------------------------------
RU[GUIDE]How To Fix Motorola Droid X2 Screen
RU[GUIDE]Motorola Droid X2 Repair Guide
XDA[GUIDE]erroronly get the phone to go into fastboot mode
DX[info] ERR: hardware/tegra/prebuild/make/../../core/system/rdl/rdl_main .c:
XDA[INFO]Uploading RDL03 failed 00080000/00300000 !! failed"
XDA[INFO]Need to wipe my phone a new way, I think..
XDA[INFO]errror"E:Can't chown/mod /system/....Installation aborted"
It probably happened to you too.....
[Off-Topic] the end of an era please lock immediately

[video] How to SBF the Droid X2 2.3.4 ginger bread (back to stock)
1. Download RSD Lite 5.7 or newer RSD Lite mirrors unzip with 7zip
2. Download your recovery firmware image (.sbf)
Verify that your download is complete with MD5/SHA-1 Hash Checksums
3. Install RSD Lite
4. Install moto driversMotorola_End_User_Driver_Installation_5.9.0 or better
see Driver issues
5. Open RSD Lite
select your recovery firmware click on “...” (top middle, see pics below...)
6. Boot moto device to RSD support (bootloader) from http://forum.xda-developers.com/showthread.php?t=1317707
a. Turn off your phone.
b. While your computer is booting back up, power up your phone by pressing and holding the VOLUME UP BUTTON and then pressing the POWER BUTTON until you see the wordsSTARTING RSD PROTOCOL SUPPORT (in white) at the top of the DX2’s screen. This should only take about 3-5 seconds.
Can’t boot to rsd protocol support?
connect to pc via usb
select Start

also see
DX[GUIDE] How to SBF an X2
XDA [GUIDE]HowTo: Perform a SBF ("factory restore") of your Motorola Droid X2
Wiping Data:
before (or after) flashing sbf, Data Wipe in Android Recovery is recommended
if phone bootloops you have no choice, but to wipe data
Notice: if you disconnect phone from pc, before phone has finished rebooting, and then try to close rsd lite, you may get a warning from rsd lite, about damaging your device
don’t worry about it phone will be fine, as long as phone boots successfully.
How to Wipe Data (DX2) fromhttp://forum.xda-developers.com/showthread.php?t=1317707
wipe data before or after flashing SBF
17. Whether or not your phone boot loops at this time, I HIGHLY recommend performing a factory reset from the Android Recovery menu. This is also the process of fixing the boot loop.
a. Pull the battery.
b. Plug the battery back in.
c. Power up your phone by pressing and holding the VOLUME DOWN BUTTON and then pressing the POWER BUTTON until you see the words FASTBOOT (in white) at the top of the DX2’s screen. This should only take about 3-5 seconds.
d. Press the VOLUME DOWN BUTTON 7 times, or until you see the words ANDROID RECOVERY.
e. Press the VOLUME UP BUTTON and the screen will add “Entering Android Recovery” under the words ANDROID RECOVERY.
f. In about 5-7 seconds, you should see a white triangle with a yellow exclamation point in the middle and a little android down and to the right of the triangle.
g. Press both volume buttons at once.
h. The Android system recovery utility (second line of text) will come up.
i. Press the VOLUME DOWN BUTTON until “wipe data/factory reset” is highlighted.
j. Press the power button to start the process.
k. Once the wipe data/factory reset process has completed, press the VOLUME UP BUTTON until reboot is highlighted.
l. Press the power button to reboot your DX2.
Activation and skipping activation:
if phone reboots to activation screen, touch android to activate or if you do not wish to activate with verizon, use four corners activation skip or Boot Android {No BP}
Activating
if phone does not boot to activation screen, it may be necessary to dial *228+ to reconnect to verizon
DF [INFO]can not activate phone/ no dial pad on *228/
XDA [INFO]No keypad during activation work around (dial *228+)
Dial *22891 to update the PRL or *22899 to program the phone and update the PRL both
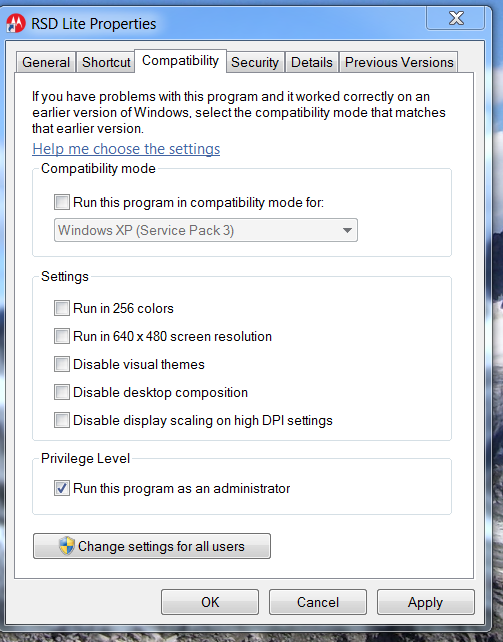
if rsd Lite is not working correctly try running as administrator,
and/or disabling virus protection
Quote: fromhttp://droid.koumakan.jp/wiki/SBF
Note: Under certain circumstances (especially when using Windows Vista and Windows 7) there might be a problem with not all device drivers being installed correctly. In such case, the flashing process will abort, and your phone won't be able to boot normally. RSDLite shows the following error message: Error switching phone to BP Pass through mode To get around this issue, once you get a Device driver could not be installed message from Windows, don't close RSDLite nor power off the phone. Start Motorola Driver Installer once again, and let it finish. Then if RSDLite didn't timeout yet, head to Device Manager, find the Unknown device, and in its properties' Driver tab click Update driver…. It should now install normally. If RSDLite timed out and you got an error from it, just repeat the SBF process. The driver should now be present, and the flashing process will finish normally. |
Driver issues
if driver is not installed correctly, when phone is connected and in rsd support,
start>control panel>hardware sound>devices & printers>device manager
may look like this

if driver is correct should look like

Once you get a Device driver could not be installed message from Windows, ...Start Motorola Driver Installer once again, and let it finish. Then ... head to Device Manager, find the Unknown device, and in its properties' Driver tab click Update driver…. It should now install normally.
may need to reboot pc-fromhttp://droid.koumakan.jp/wiki/SBF
if that does not work
download this file
Moto Drivers Drivers win 7 64bit.rar
unzip, and copy to C:\Program Files\Common Files\Motorola Shared\Mobile Drivers\Drivers
also see
YouTubeDevice Drivers Install-Tomsgt123
CNET.comUSBDeview for troubleshooting faulty USB device drivers
moto driversMotorola_End_User_Driver_Installation_5.9.0
Moto[TOOL]MOTOROLA DEVICE (Drivers) MANAGER
--------------------------------------------------------------------------------------------------------------------------
2.3.5 about phone

2.3.4 about phone

-------------------------------------------------------------------------------------------------------------------------------------------
Sources
.sbf files (see How To Flash a SBF Using RSD Lite

If you want to get serious about backing up your Android phone, including everything from system app data to saved Wi-Fi nodes, Titanium Backup can help. Read on to learn how to backup your Android phone from A to Z.
Why Bother With a Third Party Backup Application?
Android phones already come with some handy backup features; anyone who has purchased a new Android phone and plugged in the Google Account login they were using on their previous Android phone has surely been impressed with the ease in which their old contacts appeared. Newer versions of Android (2.2+) even have some extra backup features like the ability to backup your wallpaper and some applications (if the developer allows it).
While that’s great and certainly eleventy-billion times better than dealing with transferring contacts from phone to phone in the age of “dumb phones” it’s not a perfect or complete solution. If you want fine control over your backup process and the ability to backup every application and its associated data, system settings, and more, you’re going to need to rely on a third-party solution. In this tutorial we’ll show you how to backup all data with the powerful and popular Android backup app Titanium Backup.
What You’ll Need
For this tutorial you’ll only need two things
Why a rooted phone? Rooting an Android phone simply means modifying your phone so that applications can have root (administrator) access to the Android operating system. Titanium Backup requires root access to Android in order to effectively backup every aspect of the system. If Titanium Backup did not have root access it would not be able to access systems files to backup system data and it would not be able to access restricted applications in order to copy the application itself and (sometimes) the data for backup.
Phone-by-phone rooting instructions are beyond the scope of this tutorial but don’t worry. If your phone isn’t rooted already there are some excellent resources available to help you root. One of the best resources around is the XDA Development forums. Search for your specific phone/carrier for detailed guides on how to root your device. In the process you’ll learn more about your phone than you ever thought possible. Avoid simply searching Google for a rooting guide as many guides are outdated and will lead to big headaches—XDA’s forum posts and guides are frequently updated and it’s easy to make sure you’re looking at a current version.
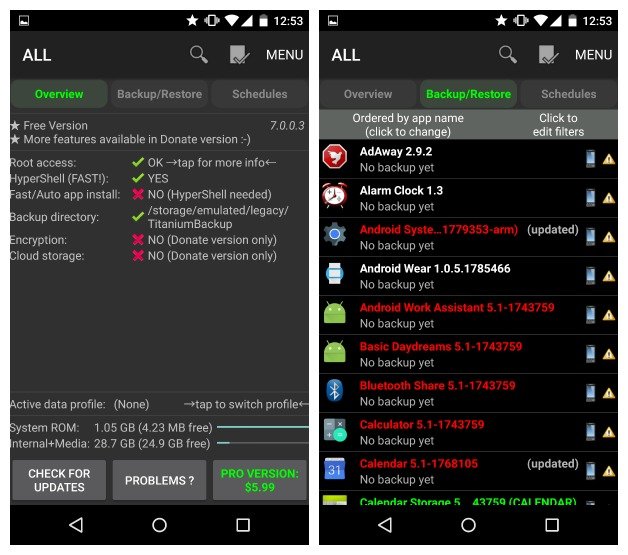
Finally, a word on Titanium Backup. It comes in two flavors: free and premium ($6.56). We’ll be using the free version for this tutorial; it’s a more than adequate program loaded with great features. The premium version adds in some additional features power users may find useful like versioned backup, backup encryption, unlimited backup scheduling, and such. You can compare the free and premium features here.
Installing Titanium Backup

If your phone is rooted and Superuser is installed, installing Titanium Backup is a breeze. If you’ve skipped the rooting process and/or installing Superuser, jump back to the previous section and check out the XDA forum to read more about your device. If you’ve done the prep work grab a copy of Titanium Backup from the Android Market and install it.

There’s only two things you really need to pay attention to during the installation process to make sure your future Titanium Backup use goes smoothly. First, you’ll get an initial prompt to elevate Titanium Backup’s user privileges. If you’re going to be using the schedule feature for automated backups (and you should be using that feature) you’ll want to check the Remember box here so that Titanium Backup doesn’t need your attention every time it goes to backup. Second, if you haven’t enabled installation of application files from unknown sources (which Titanium Backup needs in order to restore your apps from backup later) make sure to enable it.
Now that Titanium Backup in installed a small caution is in order. Do not just start clicking willy nilly around menus. Titanium Backup is a powerful application designed for power users. Unlike nearly every other application on your phone where it’s hard to even make an error let alone a really serious one, Titanium Backup gives you direct access to your system in a way that makes it significantly easier to send a wrecking ball through the guts of your phone. Read every item twice before clicking it and when you have even the slightest bit of doubt about what a function does, refer to the detailed Titanium Backup wiki for clarification before proceeding.
Performing Your First Backup

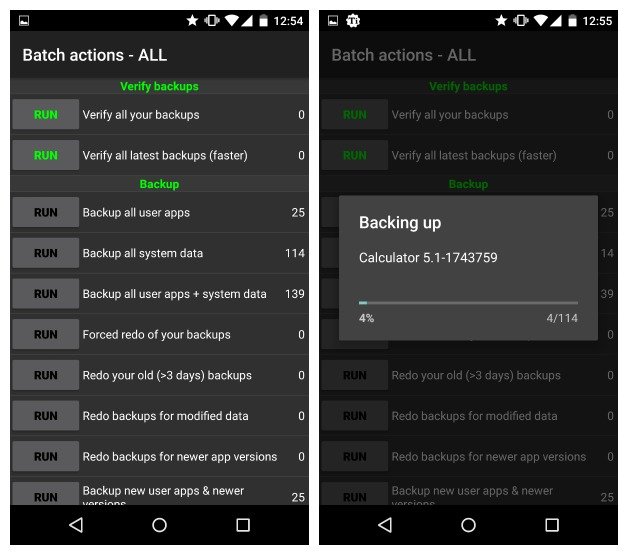
Once Titanium Backup in installed and you’ve repeated “I will not click on buttons that perform unfamiliar tasks!” three times, you’re ready for your first backup. Click on the Backup/Restore tab. Click the Menu button on your phone. From the menu that pops up at the bottom of the screen select Batch. From the large Batch menu select [RUN] Backup all user apps + system data. You can opt to only backup user apps or system data by themselves, but we installed Titanium Backup so we could do fast and total backups of our entire system and we suggest you do the same—it’s no fun to find out one data catastrophe too late that the thing you really wanted backed up wasn’t.

Once you select your backup roster, you’ll be prompted one more time. Titanium Backup wants to know if you want to kill the active apps or exclude them. You can also choose not to include certain applications in the backup. Since we have nothing pressing going on in any of our active applications we opted to Kill active apps and left all applications checked. Comprehensive backup is where it’s at. When you’re done with the batch selection menu click Run the batch operation.
Depending on the processing power of your phone and the number of applications you have installed the initial backup process can take anywhere between a minute or two to a quarter hour or more. Plug your phone in to charge and leave it be until it’s done. When’s complete you’ll see the Backup/Restore menu again. Now instead of a bunch of caution triangles beside each application (the not-backed up indicator) you’ll see a variety of smiley faces and check marks. If you’re curious what each smiley face and other marks means, click the Menu button and then click Legend to get a run down. If you see all red/M, yellow/M smileys, and check marks, everything was backed up as intended. If you see caution triangles mixed in there it’s time to run the batch again—unless the missing backups are the apps you didn’t want to kill and/or excluded from the batch list.

If everything looks good, what now? Navigate to /TitaniumBackup/ on your SD card; there you’ll find all your backups. Copy the entire directory to your computer for safekeeping, sync it to your cloud storage, or otherwise back it up. Titanium Backup is only worth as much as the backups you keep. No backups after a catastrophic data lose (that may or may not have taken your SD card with it), no restoration points to work with.
That’s it! Your first backup is complete! From here you can Schedules tab and schedule a weekly backup (upgrade to Pro to enjoy a more flexible and unlimited scheduling system). You can also tap on an individual app in the Backup/Restore list at any time to perform an immediate and one-off backup.
Restoring a Backup

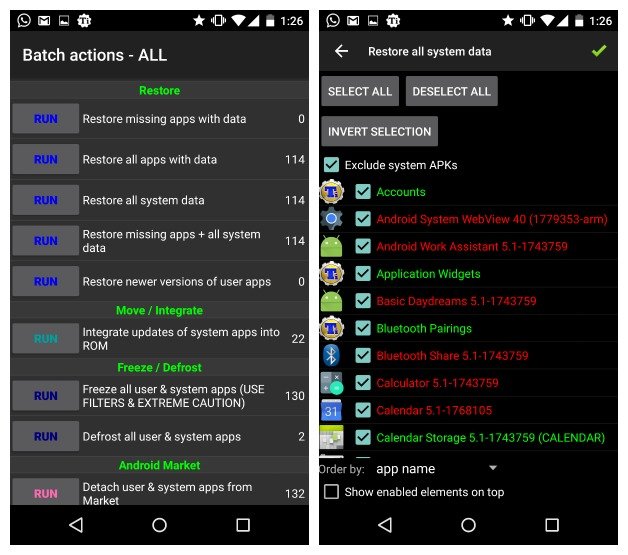
When it comes time to restore there are several options. Just like you can batch backup everything on your phone you can also batch restore everything. Navigate to the batch menu you as you did above by going to Menu-> Batch while on the Backup/Restore screen. Scroll down until you see the Restore subheading. There you can select the option that suits your batch restoration needs just as you did for your batch backup needs—see the first two panels of the above image.
A less drastic approach, let’s say you just want to restore your Angry Birds unlocked levels that have gone missing in action, is to tap on an individual application in the Backup/Restore list and click Restore—see the last panel above the above image.
In 99% of the situations restoration is a snap. For the more complicated restoration procedures like restoring data when you’ve updated your phone with a custom ROM or migrated to a new phone make sure to check out the Titanium Backup wiki for pointers.
Have a question? You’re a long time Titanium Backup user with tips to share? Sound off in the comments.
SIM-unlocking
return tosd_shadow's [Collection] of Links:
FAQs, Guides, Rooting, SBFs, ROMs... - sites.google.com
Droid 3 - Solana (XT862)
Tip: use your browser’s Find... to search page for topics
search page using ChromeFirefoxIE
Quick Links
General Android/ Motorola/Verizon
Websites/ Forums
Concepts & Vocabulary
Verify that your download is complete with MD5/SHA-1 Hash Checksums
[How To] Use ADB/fastboot
backing up contacts/ contacts not syncing
APN Settings
Apps
General Droid 3
Motorola DROID 3 - Full phone specifications - GSM Arena
Motorola DROID 3 specs - Phone Arena
New & Other
Installing Drivers and Driver errors
Stock Rom
Low Battery Options/ TBH Factory Adaptor
Flash xml recovery files (Stock Rom) with RSD Lite
Sim Card Slot Unlocking and GMS Band Unlocking
Rooting
Things to do Before Rooting
MOTOFAIL “Droid 4” by Dan Rosenberg
Custom Roms
Gapps
Troubleshooting
Repair
General
RootJunky[HOW-TO-VIDEOS] Motorola Droid 3 by Tomsgt123
xda-developersHow to Video's Root, safe strap, kexec, and much more [XDA]
Moto[INFO]droid-3---safe-modeinstructions fromVerizon
VeriZonWirelessHard Reset - DROID 3 by Motorola
Disable Automatic Restore prior to performing a hard (factory) reset
Google DriveAndroid Recovery
Google DriveAP FastBoot
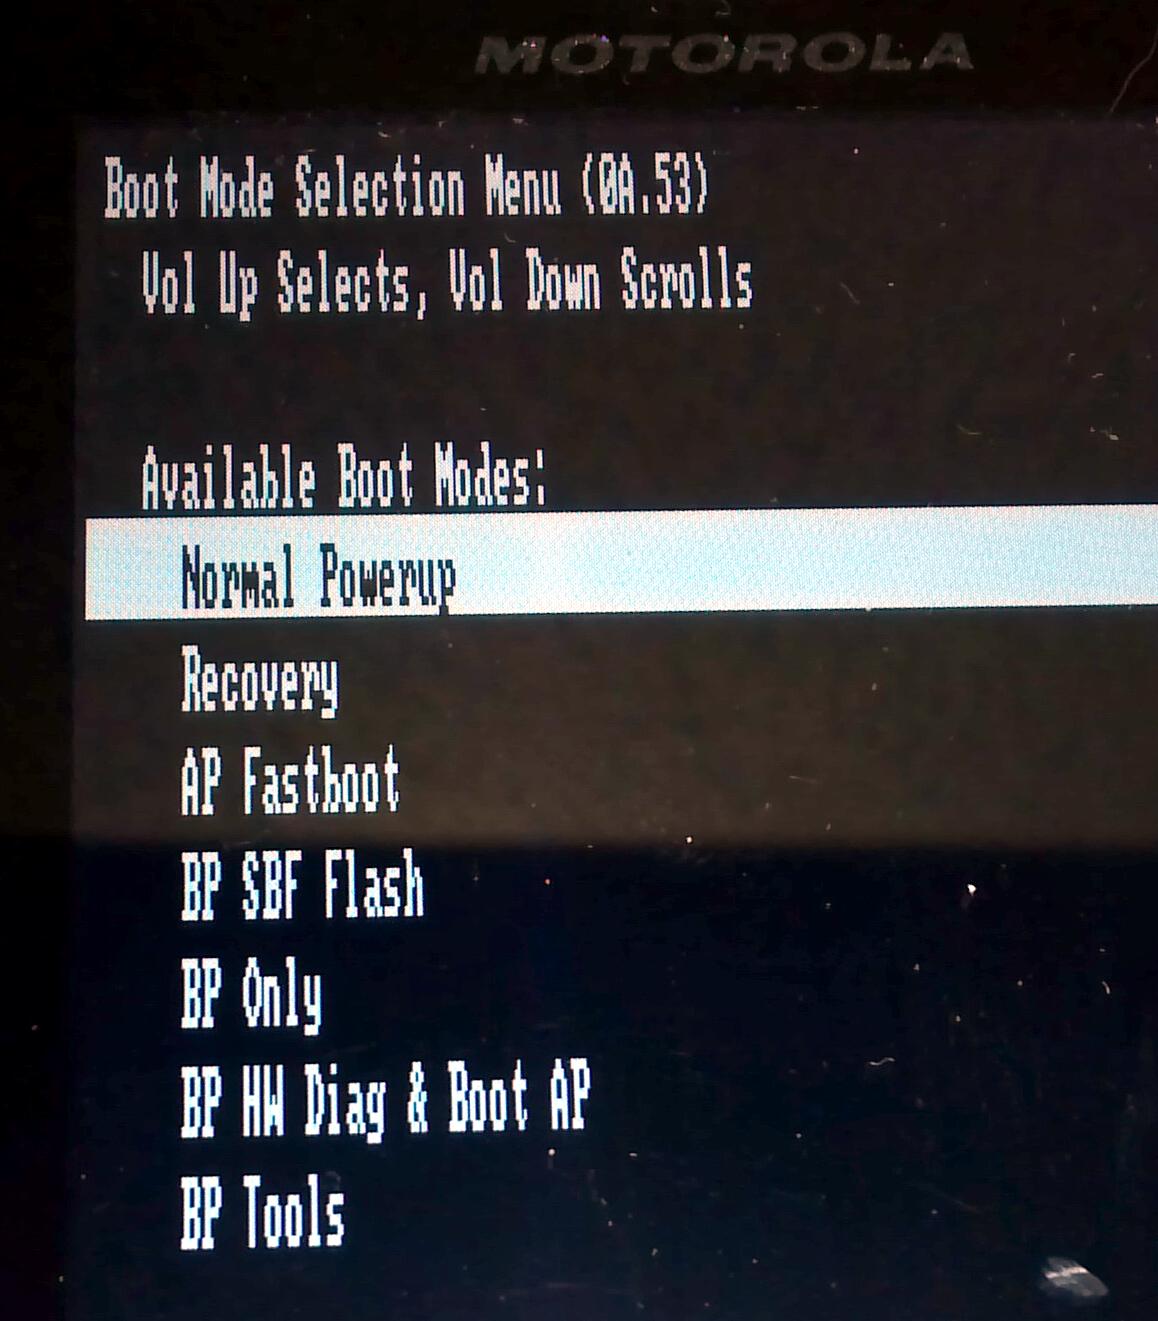
Google DriveBoot Mode Selection Menu
YouTube[Video]How to bypass the activation screen on the Motorola Droid 3
Sim Card Slot Unlocking and GMS Band Unlocking
Please note that your Droid 3 must be SIM-unlocked, which is a different thing entirely than band-unlocked, in order to use GSM networks (including those of AT&T Mobility and T-mobile USA).
mrcellphoneunlocker.com
http://sim-unlock.net
ebay.com
XDA[INFO]SigmaKey dongle
xda-developersGuide - Band Unlock XT862 for T-mobile/ATT
note: if you are seeing "The phone is subsidy locked. Please contact...",
an incorrect code was entered too many times, and the phone has locked you out.
----------------------------------------------------------------------------------------------------------------------
Battery Desktop Charger for Motorola Droid 3 XT862
xda-developers[Howto] Fix "Battery Low - Cannot program” use with care, you can fry your battery and/or phone
better option
$10 Motorola Factory Cable Adaptor by Team Black Hat
YouTubeTeam Black Hat Factory Cable Adaptor for Motorola Devices!-byDroidModd3rX
So you flashed your phone and now it thinks the battery is dead (even though it's not) and it won't let you flash it again to fix it? Or, your battery really is dead and you don't have a way to charge it because your phone is soft-bricked and won't charge the battery. What do you do? With this cable you don't even need a battery in your phone. This isour clone of what is generally referred to as a Motorola "Factory Cable". orHow to make your own Motorola "Factory Cable" orHow/why to make your own Motorola "Factory Cable"
--------------------------------------------------------------------------------------------------------------
Motorola Drivers
Installing Drivers and Driver errors
----------------------------------------------------------------------------------------------------------------
Stock Rom:.XML/SBF & Updates
info2.3.4/5.5.9592.3.4/5.6.890,2.3.4/5.7.906,
SBF2.3.4/5.5.9592.3.4/5.6.890,2.3.4/5.7.906,
update.zip NA2.3.4/5.6.8902.3.4/5.7.906,
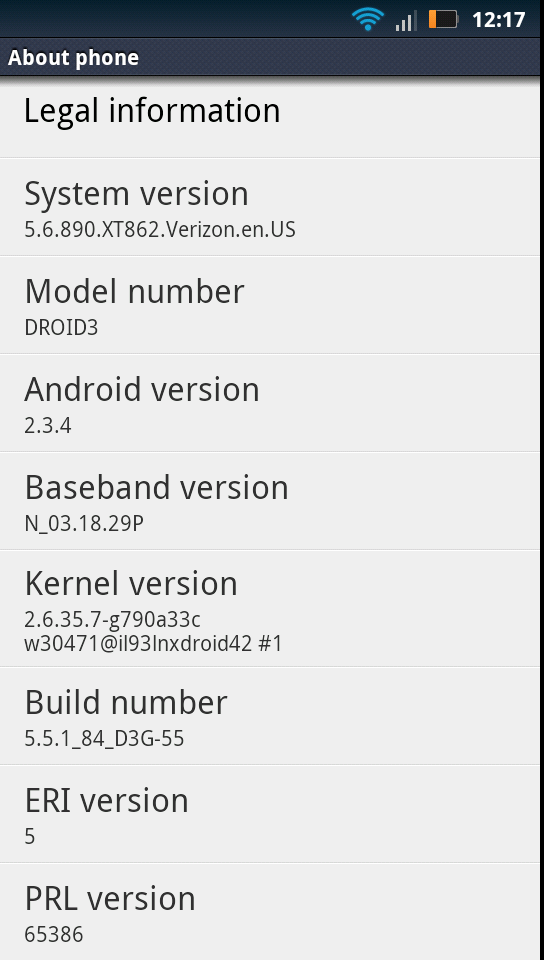
System Version 5.6.890.XT862 to 5.7.906.XT862
Kernel version 2.6.35.7-g790a33c 2.6.35.7-g5fa4155
Build number 5.5.1_84_D3G_55 5.5.1_84_D3G-66_M2-10
System Info Screenshots
Google DriveHow To Flash xml recovery files with RSD Lite
DroidForumOfficial .906 1_click sbf .exe[03-28-2013] (uses extracted 906 .xml)
xda-developersOfficial .906 1_click sbf .exe
DroidForum.906 1-click-sbf.exe + tools [06-01-2012](uses 906 update and parts 890 xml)
file is named ‘1_CLICK_SBF.exe-dl=1’ rename to ‘1_CLICK_SBF.exe’ just remove ‘-dl=1’
YouTubeHow to sbf back to 5.6.890 when on 5.7.906
xda-developersGUIDE: Getting into fastboot & recovery (Sept 2011)
xda-developersFast/Easy unbrick - Droid 3 (XT862)
xda-developersFlash Verizon DROID 3 OTA 5.6.890 to phone_psouza4.zip
RootzWikiDroid 3 Fastboot files (5.5.959 and 5.6.890)
xda-developers[Recovery] RSD v5.5.0 and 5.5.184 (aka 5.6.890) fastboot partitions/flashable zip
xda-developers[OTA LEAKS] DROID 3 (XT862) 5.7.902 AND 5.7.905 Updates from QA Server
xda-developersFlashing XT883 chinese rom on XT882 with .906
xda-developersROM] XT883 Rom v60.3.250 Android v2.3.6 (upload 1/13/2013 ROM v60.3.250)
----------------------------------------------------------------------------------------------------------------------
Rooting
Things to do before rooting
1. have a Factory Cable Adaptor by Team Black Hat, or Desktop Charger for Motorola Droid 3 XT862
2. download current .XML and Rsd lite or Official .906 1_click sbf .exe
[ROOT]MOTOFAIL “Droid 4” by Dan Rosenberg
YouTubeHow to root the Droid 3 with motofail by Tomsgt123
make sure you right-click on the motofail_windows.zip file, extract the files to a folder on your PC, and click the ‘run.bat’ file from that folder Root using a Mac and Motofail
Safestrap for multi booting ROMs
downloadSafestrap v3http://blog.hash-of-codes.com/
Droid 3 Requirements: have phone on stock gingerbread
Droid3Safestrap-3.05.apk -DevHost
Droid3Safestrap-2.10.apk -DevHost
Droid3SafestrapTweaked-1.08e.apk -DevHost
manually install the .apk
Move apk to sd card, navigate to file with phone’s file manager app, tap on it, select install,
you may have to change system settings to allow unknown sources
Menu > Settings > Applications > Unknown sources
RootJunky [Video]How to install and use safe strap 3.05 on the droid 3
YouTubeSafeStrap V3.04 for Razr, Razr Maxx, D4, Bionic, and D3!
downloadSafestrap v3http://blog.hash-of-codes.com/
Droid 3 Requirements: have phone on stock gingerbread
YouTubeInstalling D3 Bootstrapper
xda-developersflashing the 890 radio to an OTA 906 system
RootzWikiBoot OptionsSBF flash mode, recovery and more....
xda-developers[GUIDE]TBH inspired Free wireless tethering hack instructions for Droid 3
xda-developers[Script] Safe bloatware removal script (50+ apps)
--------------------------------------------------------------------------------------------------------------------
Roms
1. MOTOFAIL “Droid 4”
2.Safestrap v3
3. Backup User Data some options below but not limited to
a. backup apps with titanium backup,
Open Titanium Backup and press the "Options" . Then press "Batch." Run the Backup all User Apps tool and wait for the process to complete.
b. backup texts and call log with sms backup +
c. Bookmark Backup Open "Backup Bookmarks" and backup your browser bookmarks.
d. verify that contacts are backed up/ synced or Import / Export Contacts to SD Card
e. Make a Nandroid Backup of stock rom with safestrap
YouTubeHow to install and use safe strap 3.05 on the droid 3
several roms here XDADroid 3 Android Development
chevycam94 Dev-Host Droid 3 files
Gingerbread roms
Steel Droid: 5.0 Gingerbread - 1-11-2013
Minimoto v1.7 XT862/XT860- Less is more. installing minimoto
XT861 5.8.25 Stock ROM. Android 2.3.6 - UPDATED 1/23
XT860-MavROM-4.5.zip it's not the XT862 build prop version but should run fine on wifi only
https://www.dropbox.com/s/d11dihrqfb...MavROM-4.5.zip
http://www.mediafire.com/?qasu5s2zoa5rhab
ICS: Ice Cream Sandwich
Steel Droid: 5.6 - Ice Cream Sandwich and safestrap 1.08e
cm9
Jellybean (no camera)
How To Install CyanogenMod Android for Motorola Droid 3 ("solana")
[KEXEC] JB ROMS For Droid 3
[JB] [4.2.2] Avatar ROM for Motorola Droid 3 (solana) - Updated [May 18,2013]
Goo.im Downloads - Browsing solana
with aosp/aokp/cm make sure you flash correct GAAPS...
http://forum.xda-developers.com/showthread.php?t=1977174
D3 JB Airplane Mode issue. ***SOLVED WITH SOLUTION***
xda-developersCURRENT DROID 3 DEVELOPMENT: 26Feb2013
RootJunkyHow to install cm10.1 on the Droid 3 using safe strap 3.05
RootzWiki[PORT] Eclipse V2.2
DroidForumEclipse v3.0 Droid 3 Port
DroidForumedit non safestrap rom to make it compatible
----------------------------------------------------------------------------------------------------------------------
New & Other
xda-developersTBH inspired Free wireless tethering hack instructions for Droid 3 (Radiocomm)
xda-developersTBH Tether Patch / UnpatchPatch.zip
android-wifi-tether
xda-developersDroid 3 CPUs have 2 different silicon revisions of the OMAP4430 depending on when the device was manufactured.
----------------------------------------------------------------------------------------------------------------------------
Motorola Droid 3 Parts
Motorola Droid 3 Screen Repair Take Apart Repair Guide
----------------------------------------------------------------------------------------------------------------------------
Android system recovery <3a>
with device off
hold X & power, when you see triangle, !, & Andy, press both volume buttons
scroll with volume buttons, select with power
Hard Reset - DROID 3 by Motorola


-------------------------------------------------------
AP Fastboot Flash Mode
with device off, hold volume down & power, to boot
0A.33current version is 5.5.959
0A.53 you can use2.3.4/5.6.890.xml or 5.5.959.xml
0A.64 you can only use 5.7.906 .xml


if it says batterylow, Cannot Program you need a charged battery, before flashing
if it says Connect USB Data Cable, try a different usb data cable, usb port, or pc

---------------------------------------------------------------------------------------------------------------
Boot Mode Selection Menu (0A.64) or (0A.53)
with phone off, hold M & power

---------------------------------------------------------------------------
System Info

download RSD Lite 5.7 or better.
download your recovery firmware imageDroid 3 XML file
here are 3 system versions 2.3.4... 5.5.959, 5.6.890 and 5.6.906
just know which system version is on phone you can not flash older versions,
so if 890 is on phone you can only use 890 or 906
Verify that your download is complete with MD5/SHA-1 Hash Checksums
install RSD Lite
install moto driversMotorola_End_User_Driver_Installation_5.9.0 or better
see installing drivers and driver errors
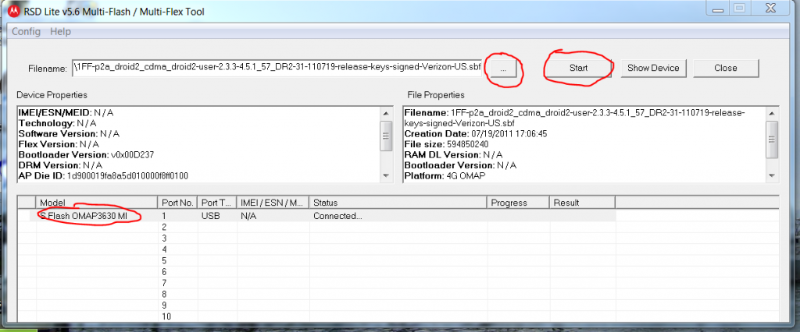
open rsd Lite
select your recovery firmware click on “...” (top middle, see pics below...)
boot moto device to AP flash mode
connect to pc via usb
select Start
Wiping Data:
before (or after) flashing sbf, wiping data in android recovery is recommended
if you choose not to wipe data, at least wipe cache, if phone bootloops you have no choice, but to wipe data
Notice: if you disconnect phone from pc, before phone has finished rebooting, and then try to close rsd lite, you may get a warning from rsd lite, about damaging your device
don’t worry about it phone will be fine, as long as flashing is done
Activation and skipping activation:
if phone reboots to activation screen, touch android to activate
skipping activation
if you do not wish to activate with verizon, usefour corners activation skip
also if phone does not boot to activation screen, it may be necessary to dial *228+ to reconnect to verizon
DF [INFO]can not activate phone/ no dial pad on *228/
xda-developersNo keypad during activation work around (dial *228+)
Dial *22891 to update the PRL or *22899 to program the phone and update the PRL both
if rsd Lite is not working correctly try running as administrator, and/or disabling virus protection

----------------------------------------------------------------------------------------------------------
Installing Drivers and Driver Errors
YouTubeDevice Drivers Install-Tomsgt123
CNET.comUSBDeview for troubleshooting faulty USB device drivers
Dev-HostMotorola_End_User_Driver_Installation_5.9.0_ Dev-H
Moto[TOOL]MOTOROLA DEVICE (Drivers) MANAGER
errors
open Windows Device Manager
Motorola device
should look something like this

if you see a yellow triangle like this
select uninstall, disconnect, usb data cable, reconnect
may need to reinstall drivers

Once you get a Device driver could not be installed message from Windows, ...Start Motorola Driver Installer once again, and let it finish. Then ... head to Device Manager, find the Unknown device, and in its properties' Driver tab click Update driver…. It should now install normally.
may need to reboot pc-fromhttp://droid.koumakan.jp/wiki/SBF
if that does not work
download this file
Moto Drivers Drivers win 7 64bit.rar
unzip, and copy to C:\Program Files\Common Files\Motorola Shared\Mobile Drivers\Drivers
----------------------------------------------------------------------------------------------------------------------
Troubleshooting
xda-developersBaseband version, IMEI, MEID is "unknown"
xda-developersDroid 3 no PRL no ERI no Service
Stock Firmware/ XMLs
http://sbf.droid-developers.org/cdma_solana/list.php
return tosd_shadow's [Collection] of Links:
FAQs, Guides, Rooting, SBFs, ROMs... - Google Docs
5 Simple Fixes for Common Google Play Store Problems
When the Google Play Store crashes, it sometimes gives you an error code. While searching the internet for each code helps, oftentimes it's not necessary. Most Play Store problems require one of five basic fixes.
The Basics of Fixing Google Play Store Problems
There are five different fixes for repairing most Play Store errors. You don't need to use all of these; try the first one and see if it fixes the problem. If it doesn't, move to the next.
The five fixes are:
- Stop the app and then wipe the Store's cache and/or data.
- Switch from a data connection to Wi-Fi.
- Uninstall updates to the Play Store and update it again.
- Refresh your Google account.
- Register your device with Google.
Walking through these steps will resolve the majority of Play Store problems. However, we will cover some common error codes that these methods won't fix later.
Why Modifying Android Causes Google Play Store Failures
This discussion does not cover rooted devices or those running a custom ROM. These processes change Android's system files and thus introduce too many variables to diagnose. These changes can stop the Play Store from functioning.
That's a big reason why installing custom ROMs or restoring from a backup using a custom recovery sometimes prevents the Store from working. We advise using Titanium Backup, or a similar backup solution, to restore apps with data.
Don't get me wrong; there are a lot of reasons to install a custom ROM. Unfortunately, when something goes wrong (as it often does), troubleshooting requires greater experience and effort than on an unmodified device.
1. Stop App, Wipe Cache and Data
The Google Play Store relies on other processes that run silently in the background. Whenever you wipe the Play Store, it's also a good idea to do the same with Google Play services and Google Services Framework---we've looked at updating Google Play services if you want to try that first.
Optionally, you may also want to wipe data for Download Manager.
Once wiped, restart your device and then reattempt the installation or update. This may require reentering your login information. Here's a step-by-step rundown (the process may vary slightly depending on your device and Android version):
First, go to Settings. Then navigate to Apps and find the tab for All. (On Android 9 Pie, choose Apps & notifications > See all X apps.)
2 Images
Here, choose Google Play Store. Select Force Stop, which will kill the app's process. After this, tap Storage to get more options. On the resulting screen, tap Clear Cache to remove temporary data and hopefully fix the problem.
If it doesn't, you can try Clear Data. This also wipes the cache, but essentially resets the app to its original form. This means you may need to log back in and configure preferences again.
2 Images
If the above process doesn't fix your issue, try repeating it for Google Play services, Google Services Framework, and Download Manager. Note that you'll need to tap the three-dot Menu button at the top-right of the All apps screen and toggle Show system to see the latter two entries.
We've looked more closely at the "Unfortunately Google Play Services has stopped" error if you're having issues with that specifically.
2. Switch From Data to Wi-Fi
A lot of apps won't install if you're on an unreliable internet connection, which is a common issue with mobile data.
To switch from mobile data to Wi-Fi, drag down from the top of your screen with two fingers to open Quick Settings. Press and hold on the Wi-Fi icon to open its settings, where you can find a list of nearby networks. If there aren't any suitable ones nearby, wait until you're back on your home network.
It's possible to have the opposite problem as well. When you have problems installing an app over a Wi-Fi network, try switching to mobile data and reattempt installation. If it works, it may require that you diagnose an issue on your network.
Finally, you should also disable your VPN, if you use one. A VPN can cause issues with Play Store downloads.
3. Uninstall and Reinstall the Play Store App
On a rooted device, you can uninstall the Play Store app and reinstall it again from scratch. But even on a non-rooted device, you can take a similar troubleshooting step.
To do this, open Settings > Apps & notifications > See all X apps. Select Google Play Store from the list. On its page, tap the three-dot Menu button and choose Uninstall updates. This will revert the Play Store app to its original version.
Once you've done this, you can update to the latest version of the Play Store in two ways. One is simply opening the Play Store and selecting Settings from the left slide-out menu. Here, scroll down and tap the Play Store version entry to check for updates.
2 Images
Alternatively, you can grab a copy of the Play Store APK from APKMirror and sideload it to force the update. See below for more info on sideloading.
4. Refresh Your Google Account
Refreshing (removing and re-adding) your Google Account isn't too hard. Be warned: Doing this will remove data from your device that's synced with your Google account. This could include messages, photos, contacts, and more.
First, go to Settings > Accounts. Select the Google account that's experiencing issues. If multiple accounts suffer from the problem, you remove them all. On Android Pie, you can simply tap Remove account to erase it. On older versions, tap the three-dot Menu button and choose Remove account.
2 Images
You can then add your account back from the Accounts menu. It's not a bad idea to restart your phone after re-adding your account.
5. Register Your Device With Google
In 2018, Google cracked down on unlicensed Android devices. These are phones and tablets from no-name brands that failed to pay the licensing fees for the Android operating system. In most cases, Google completely stops the Play Store from working. In other cases, the Play Store won't run any Google-branded apps, like Gmail or Google Maps.
You might see Error Code 501 or a warning that you own an unlicensed device. In other cases, you might not receive any error message or warning at all. Fortunately, Google now allows unlicensed devices access to the Play Store. But there's a catch: you need to register the device with Google. The process is easy.
How to Register Your Android Device With Google
First, download and install the app Device ID to get easy access to your phone's information. If you can't access the Play Store, try sideloading the app from APKMirror. Once installed, copy the Google Service Framework number.
Second, now that you have the number copied to your clipboard, go to Google's device registration site. Here, you'll need to log into your Google account. Once logged in, long-press the text input box for Google Services Framework Android ID and paste the number copied from the app Then hit the Register button.
Restart your device. Once it reboots, you should be able to either update the Google Play Store or download apps again as normal.
Other Google Play Store Error Codes and Fixes
One XDA user has compiled a mammoth list of Play Store error codes containing roughly 20 common issues. Most require you to perform the actions listed above (cache wipe and similar), although a few are exceptions to this rule.
These exceptions are:
- Error 498: In this case, your phone's cache is full. Try wiping the cache partition using your phone's recovery.
- Error 919: Your phone's storage is full. You'll need to free up space on your device in order to continue.
- Error 403: You're using two different Google accounts on the same device. You'll need to use the correct account; consider removing the other one.
- Error 927: The Play Store is already updating, so there's no reason to troubleshoot this issue. Just wait until it finishes updating.
- Error 101: You have too many apps installed. Try removing a few.
- Error 919: Your Access Point Name settings aren't correct. This requires getting the correct APN settings and reconfiguring your device.
Apps to Diagnose Play Store Issues
One of the best resources for these issues is the app Error Codes & Fixes, which combines the knowledge of AndroidPIT's users and editors on resolving Android error codes. The app is designed as a reference utility and includes both Android error codes and Play Store error codes. Input the code you see and the app displays potential fixes.
On the downside, the app displays full-screen ads. While ads are a small price to pay for resolving a device-disabling bug, you might prefer to search Google for your particular error code, if you haven't solved it yet.
If all else fails, you can always try the Amazon App Store or F-Droid. Both install on pretty much any device and run into fewer problems than Google's Play Store.
Resolving Google Play Store Issues
Fixing Play Store problems isn't impossible. If the basic troubleshooting methods (like wiping the Play Store's cache and data) fail, you can always look up your particular error code and solve almost any problem---unless you've installed a custom ROM, that is.
Fortunately, you can try manually installing Google Apps. This works for both custom ROMs and in cases where you don't have the Play Store installed by default.
Keep in mind that you might encounter certain Play Store problems, such as blocked apps, if you have relocated. In such cases, updating the country/region setting in Google Play Store can fix the problem!
SIM-unlocking
return tosd_shadow's [Collection] of Links:
FAQs, Guides, Rooting, SBFs, ROMs. - sites.google.com
Droid 3 - Solana (XT862)
Tip: use your browser’s Find. to search page for topics
search page using ChromeFirefoxIE
Quick Links
General Android/ Motorola/Verizon
Websites/ Forums
Concepts & Vocabulary
Verify that your download is complete with MD5/SHA-1 Hash Checksums
[How To] Use ADB/fastboot
backing up contacts/ contacts not syncing
APN Settings
Apps
General Droid Spotify Premium 8.6.54.818 APK Crack for PC With Activation Code [2021] DROID 3 - Full phone specifications - GSM Arena
Motorola DROID 3 specs - Phone Arena
New & Other
Installing Drivers and Driver errors
Stock Rom
Low Battery Options/ TBH Factory Adaptor
Flash xml recovery files (Stock Rom) with RSD Lite
Sim Card Slot Unlocking and GMS Band Unlocking
Rooting
Things to do Before Rooting
MOTOFAIL “Droid 4” by Dan Rosenberg
Custom Roms
Gapps
Troubleshooting
Repair
General
RootJunky[HOW-TO-VIDEOS] Motorola Droid 3 by Tomsgt123
xda-developersHow to Video's Root, safe strap, kexec, and much more [XDA]
Moto[INFO]droid-3---safe-modeinstructions fromVerizon
VeriZonWirelessHard Reset - DROID 3 by Motorola
Disable Automatic Restore prior to performing a hard (factory) reset
Google DriveAndroid Recovery
Google DriveAP FastBoot
Google DriveBoot Mode Selection Menu
YouTube[Video]How to bypass the activation screen on the Motorola Droid 3
Sim Card Slot Unlocking and GMS Band Unlocking
Please note that your Droid 3 must be SIM-unlocked, which is a different thing entirely than band-unlocked, in order to use GSM networks (including those of AT&T Mobility and T-mobile USA).
mrcellphoneunlocker.com
http://sim-unlock.net
ebay.com
XDA[INFO]SigmaKey dongle
xda-developersGuide - Band Unlock XT862 for T-mobile/ATT
note: if you are seeing "The phone is subsidy locked. Please contact.",
an incorrect code was entered too many times, and the phone has locked you out.
----------------------------------------------------------------------------------------------------------------------
Battery Desktop Charger for Motorola Droid 3 XT862
xda-developers[Howto] Fix "Battery Low - Cannot program” use with care, you can fry your battery and/or phone
better option
$10 Motorola Factory Cable Adaptor by Team Black Hat
YouTubeTeam Black Hat Factory Cable Adaptor for Motorola Devices!-byDroidModd3rX
So you flashed your phone titanium backup pro apk xda Activators Patch now it thinks the battery is dead (even though it's not) and it won't let you flash it again to fix it? Or, your battery really is dead and you don't have a way to charge it because your phone is soft-bricked and won't charge the battery. What do you do? With this cable you don't even need a battery in your phone. This isour clone of titanium backup pro apk xda Activators Patch is generally referred to as a Motorola "Factory Cable". orHow to make your own Motorola "Factory Cable" orHow/why to make your own Motorola "Factory Cable"
--------------------------------------------------------------------------------------------------------------
Motorola Drivers
Installing Drivers and Driver errors
----------------------------------------------------------------------------------------------------------------
Stock Rom:.XML/SBF & Updates
info2.3.4/5.5.9592.3.4/5.6.890,2.3.4/5.7.906,
SBF2.3.4/5.5.9592.3.4/5.6.890,2.3.4/5.7.906,
update.zip NA2.3.4/5.6.8902.3.4/5.7.906,
System Version 5.6.890.XT862 to 5.7.906.XT862
Kernel version 2.6.35.7-g790a33c 2.6.35.7-g5fa4155
Build number 5.5.1_84_D3G_55 5.5.1_84_D3G-66_M2-10
System Info Screenshots
Google DriveHow To Flash xml recovery files with RSD Lite
DroidForumOfficial .906 1_click sbf .exe[03-28-2013] (uses extracted 906 .xml)
xda-developersOfficial .906 1_click sbf .exe
DroidForum.906 1-click-sbf.exe + tools [06-01-2012](uses 906 update and parts 890 xml)
file is named ‘1_CLICK_SBF.exe-dl=1’ rename to ‘1_CLICK_SBF.exe’ just remove ‘-dl=1’
YouTubeHow to sbf back to 5.6.890 when on 5.7.906
xda-developersGUIDE: Getting into fastboot & recovery (Sept 2011)
xda-developersFast/Easy unbrick - Droid 3 (XT862)
xda-developersFlash Verizon DROID 3 OTA 5.6.890 to phone_psouza4.zip
RootzWikiDroid 3 Fastboot files (5.5.959 and 5.6.890)
xda-developers[Recovery] RSD v5.5.0 and 5.5.184 (aka 5.6.890) fastboot partitions/flashable zip
xda-developers[OTA LEAKS] DROID 3 (XT862) 5.7.902 AND 5.7.905 Updates from QA Server
xda-developersFlashing XT883 chinese rom on XT882 with .906
xda-developersROM] XT883 Rom v60.3.250 Android v2.3.6 (upload 1/13/2013 ROM v60.3.250)
----------------------------------------------------------------------------------------------------------------------
Rooting
Things to do before rooting
1. have a Factory Cable Adaptor by Team Black Hat, or Desktop Charger for Motorola Droid 3 XT862
2. download current .XML and Rsd lite or Official .906 1_click sbf .exe
[ROOT]MOTOFAIL “Droid 4” by Dan Rosenberg
YouTubeHow to root the Droid 3 with motofail by Tomsgt123
make sure you right-click on the motofail_windows.zip file, extract the files snapgene license key Activators Patch a folder on your PC, and click the ‘run.bat’ file from that folder Root using a Mac and Motofail
Safestrap for multi booting ROMs
downloadSafestrap v3http://blog.hash-of-codes.com/
Droid 3 Requirements: have phone on stock gingerbread
Droid3Safestrap-3.05.apk -DevHost
Droid3Safestrap-2.10.apk -DevHost
Droid3SafestrapTweaked-1.08e.apk -DevHost
manually install the .apk
Move apk to sd card, navigate to file with phone’s file manager app, tap on it, select install,
you may have to change system settings to allow unknown sources
Menu > Settings > Applications > Unknown sources
RootJunky [Video]How to install and use safe strap 3.05 on the droid 3
YouTubeSafeStrap V3.04 for Razr, Razr Maxx, D4, Bionic, and D3!
downloadSafestrap v3http://blog.hash-of-codes.com/
Droid 3 Requirements: have phone on stock gingerbread
YouTubeInstalling D3 Bootstrapper
xda-developersflashing the 890 radio to an OTA 906 system
RootzWikiBoot OptionsSBF flash mode, recovery and more.
xda-developers[GUIDE]TBH inspired Free wireless tethering hack instructions for Droid 3
xda-developers[Script] Safe bloatware removal script (50+ apps)
--------------------------------------------------------------------------------------------------------------------
Roms
1. MOTOFAIL “Droid 4”
2.Safestrap v3
3. Backup User Data some options below but not limited to
a. backup apps with titanium backup,
Open Titanium Backup and press the "Options". Then press "Batch." Run the Backup all User Apps tool and wait for the process to complete.
b. backup texts and call log with sms backup +
c. Bookmark Backup Open "Backup Bookmarks" and backup your browser bookmarks.
d. verify that contacts are backed up/ synced or Import / Export Contacts to SD Card
e. Make a Nandroid Backup of stock rom with safestrap
YouTubeHow to install and use safe strap 3.05 on the droid 3
several roms here XDADroid 3 Android Development
chevycam94 Dev-Host Droid 3 files
Gingerbread roms
Steel Droid: 5.0 Gingerbread - 1-11-2013
Minimoto v1.7 XT862/XT860- Less is more. installing minimoto
XT861 5.8.25 Stock ROM. Android 2.3.6 - UPDATED 1/23
XT860-MavROM-4.5.zip it's not the XT862 build prop version but should run fine on wifi only
https://www.dropbox.com/s/d11dihrqfb.MavROM-4.5.zip
http://www.mediafire.com/?qasu5s2zoa5rhab
ICS: Ice Cream Sandwich
Steel Droid: 5.6 - Ice Cream Sandwich and safestrap 1.08e
cm9
Jellybean (no camera)
How To Install CyanogenMod Android for Motorola Droid 3 ("solana")
[KEXEC] JB ROMS For Droid 3
[JB] [4.2.2] Avatar ROM titanium backup pro apk xda Activators Patch Motorola Droid 3 (solana) - Updated [May 18,2013]
Goo.im Downloads - Browsing solana
with aosp/aokp/cm make sure you flash correct GAAPS.
http://forum.xda-developers.com/showthread.php?t=1977174
D3 JB Airplane Mode issue. ***SOLVED WITH SOLUTION***
xda-developersCURRENT DROID 3 DEVELOPMENT: 26Feb2013
RootJunkyHow to install cm10.1 on the Droid 3 using safe strap 3.05
RootzWiki[PORT] Eclipse V2.2
DroidForumEclipse v3.0 Droid 3 Port
DroidForumedit non safestrap rom to make it compatible
----------------------------------------------------------------------------------------------------------------------
New & Other
xda-developersTBH inspired Free wireless tethering hack instructions for Droid 3 (Radiocomm)
xda-developersTBH Tether Patch / UnpatchPatch.zip
android-wifi-tether
xda-developersDroid 3 CPUs have 2 different silicon revisions of the OMAP4430 depending on when the device was manufactured.
----------------------------------------------------------------------------------------------------------------------------
Motorola Droid 3 Parts
Motorola Droid 3 Screen Repair Take Apart Repair Guide
----------------------------------------------------------------------------------------------------------------------------
Android system recovery <3a>
with device off
hold X & power, when you see triangle, !, & Andy, press both volume buttons
scroll with volume buttons, select with power
Hard Reset - DROID 3 by Motorola
-------------------------------------------------------
AP Fastboot Flash Mode
with device off, hold volume down & power, to boot
0A.33current version is 5.5.959
0A.53 you can use2.3.4/5.6.890.xml or 5.5.959.xml
0A.64 you can only use 5.7.906 .xml
if it says batterylow, Cannot Program you need a charged battery, before flashing
if it says Connect USB Data Cable, try a different usb data cable, titanium backup pro apk xda Activators Patch, usb port, or pc
---------------------------------------------------------------------------------------------------------------
Boot Mode Selection Menu (0A.64) or (0A.53)
with phone off, hold M & power
---------------------------------------------------------------------------
System Info
download RSD Lite 5.7 or better.
download your recovery firmware imageDroid 3 XML file
here are 3 system versions 2.3.4. 5.5.959, 5.6.890 and 5.6.906
just know which system version is on phone you can not flash older versions,
so if 890 is on phone you can only use 890 or 906
Verify that your download is complete with MD5/SHA-1 Hash Checksums
install RSD Lite
install moto driversMotorola_End_User_Driver_Installation_5.9.0 or better
see installing drivers and driver errors
open rsd Lite
select your recovery firmware click on “.” (top middle, titanium backup pro apk xda Activators Patch, see pics below.)
boot moto device to AP flash mode
connect to pc via usb
select Start
Wiping Data:
before (or after) flashing sbf, wiping data in android recovery is recommended
if you choose not to wipe data, at least wipe cache, if phone bootloops you have no choice, but to wipe data
Notice: if you disconnect phone from pc, before phone has finished rebooting, and then try to close rsd lite, you may get a titanium backup pro apk xda Activators Patch from rsd lite, about damaging your device
don’t worry about it phone titanium backup pro apk xda Activators Patch be fine, as long as flashing is done
Activation and skipping activation:
if phone reboots to activation screen, touch android to activate
skipping activation
if you do not wish to activate with verizon, usefour corners activation skip
also if phone does not boot to activation screen, it may be necessary to dial *228+ to reconnect to verizon
DF [INFO]can not activate phone/ no dial pad on *228/
xda-developersNo keypad during activation work around (dial *228+)
Dial *22891 to update the PRL or *22899 to program the phone titanium backup pro apk xda Activators Patch update the PRL both
if rsd Lite is not working correctly try running as administrator, and/or disabling virus protection
----------------------------------------------------------------------------------------------------------
Installing Drivers and Driver Errors
YouTubeDevice Drivers Install-Tomsgt123
CNET.comUSBDeview for troubleshooting faulty USB device drivers
Dev-HostMotorola_End_User_Driver_Installation_5.9.0_ Dev-H
Moto[TOOL]MOTOROLA DEVICE (Drivers) MANAGER
errors
open Windows Device Manager
Motorola device
should look something like this
if you see a yellow triangle like this
select uninstall, disconnect, usb data cable, reconnect
may need to reinstall drivers
Once you get a Device driver could not be installed message from Windows. .Start Motorola Driver Installer once again, and let it finish. Then . head to Device Manager, find the Unknown device, and in its properties' Driver tab click Update driver…. It should now install normally.
may need to reboot pc-fromhttp://droid.koumakan.jp/wiki/SBF
if that does not work
download this file
Moto Drivers Drivers win 7 64bit.rar
unzip, and copy to C:\Program Files\Common Files\Motorola Shared\Mobile Drivers\Drivers
----------------------------------------------------------------------------------------------------------------------
Troubleshooting
xda-developersBaseband version, IMEI, MEID is "unknown"
xda-developersDroid 3 no PRL no ERI no Service
Stock Firmware/ XMLs
http://sbf.droid-developers.org/cdma_solana/list.php
return tosd_shadow's [Collection] of Links:
FAQs, Guides, Rooting, SBFs, ROMs. - Google Docs
Best backup you can have A must have tool if you are into changing phones or roms frequently. Titanium Backup Pro v8.0.0 APK is the most powerful backup tool on Android. You can create backup, restore, freeze your apps + data + link on the market. Addition of cloud support is awesome and gives you piece of mind if your SD card fails or you phone is stolen. I use it almost every day. If there is one feature that could be added it is to allow syncing to a cloud storage instance.
Titanium Backup ★ root
You can backup, restore, and freeze (with Pro) your apps + data + links from the market. This includes all protected system apps and apps, as well as external data from your SD card. You can make batch and scheduled backups to 0 clicks. Backups work without closing apps (with Pro). You can move any application (or application data) to/from the SD card. You can browse the data of any app and even query the Market to get detailed information about the application.
Titanium Backup PRO Key root Apk Features:
Also see the paid PRO key which adds EVEN MORE awesome features such as:
- 0-click batch restores
- Convert user apps <=> system apps
- Keep multiple backups per app
- Integrate system app updates into ROM
- Backup/restore SMS, MMS, calls, bookmarks,Wi-Fi AP as XML
- Encryption
- Multi-user app data
- Market Doctor (relink apps to Market)
- Apps freezer
- “Destroy all Market links” feature
- Hypershell speed
- Backup apps without closing them!
- Unlimited schedules
- Sync to/from Dropbox, box, Google drive (manual/scheduled)
- Create your own update.zip containing apps+data!
- TB Web Server: download/upload your backups as a single ZIP on your computer
- Restore individual apps+data from non-root ADB backups!
- Market “auto updating” manager
- Dalvik cache cleaner
- System logs cleaner
- Integrate Dalvik cache system elements into ROM
- Restore individual apps+data from TWRP backups and CWM backups!
- Load/Save a Filter and use it in Widgets/Schedules
- Protect backup against deletion
- Send backup (to e-mail/cloud) and import it in 1 click
- Change the device’s Android ID, restore it from a backup or after a factory reset
- Backup→Verify→Un-install an app in one shot
- CSV export any app DB (e-mail or Google Docs)
- Freeze/defrost/launch apps in a single click
- Convert app data to/from fast WAL format
- And lot’s more on Titanium Backup PRO Apk + TB Apk.
Check out this in-depth review of TB PRO:
And check out the new TB PRO demo video:
Here’s the older TB demo video:
How to’s?
Backup on rooted device:
- Verify that Titanium Backup app has started without warning and that your Superuser/busybox is OK
- tap on the Backup/Restore tab
- And Tap Menu (the button), Batch
- Click “Backup all user apps”
- Let it run, then go back
- Individually backup the system data you want. That is most green-colored items. This will be call log, calendar, bookmarks, launcher, WiFi, etc.
- Now your backups are in the “TitaniumBackup” directory on your SD card.
See full details here How to Backup Android Data and keep safe Everything
Restore your backups on a new phone, or after installing a ROM (if you wiped your phone):
- At frist, titanium backup pro apk xda Activators Patch, Download Titanium Backup apk or TB pro key apk from internet or from here.
- Then run this app and tap on the Backup/Restore tab
- Tap on Menu (the button), Batch
- Now tap on “Restore all missing apps + system data”
- Reboot your android phone
- It’s done ! The only thing you may have to adjust is usually your wallpaper/widgets.
Titanium Backup PRO Apk + TB Apk Download for Android
Read full description on Google Play store: Application and Activation Key
| Google Play Store ID | com.keramidas.TitaniumBackup com.keramidas.TitaniumBackupPro |
| Updated | 21 February 2017 |
| Installs | 10,000,000 – 50,000,000 |
| Current Version | 8.0.0 |
| Requires Android | 1.5 and up |
| Content Rating | Rated for 3+ |
| Offered By | Titanium Track |
Download:
Note
- Must have for Root users!
- Enjoy!
WHAT’S NEW on Titanium Backup PRO Apk + TB Apk
- Added support for ESET Internet Security 12.1.34.0 License Key storage (Android 6.0+) including: Backup/Restore, Free space gauge, Restore destination override, Data profiles.
- [PRO] Upgraded to Dropbox API v2 (needs re-authentication).
- Added the ability to “force move” apps to/from Adoptable storage.
- Updated translations.
See also:
Some advice:
• We recommend to avoid “modified” TB versions because they can cause various problems down the road.
Tags: titanium backup pro apk cracked, titanium backup pro key apk, donate version apk, TB pro apk xda.
Android Backup
AndroidFit
Hi, Here's AndroidFit admin!! I always try to give my best to this website.
If you want to get serious about backing up your Android phone, titanium backup pro apk xda Activators Patch, including everything from system app data to saved Wi-Fi nodes, Titanium Backup can help. Read on to learn how to backup your Android phone from A to Z.
Why Bother With a Third Party Backup Application?
Android phones already come with some handy backup features; anyone who has purchased a new Android phone and plugged in the Google Account login they were using on their previous Android phone has surely been impressed with the ease in which their old contacts appeared. Newer versions of Android (2.2+) even have some extra backup features like the ability to backup your wallpaper and some applications (if the developer allows it).
While that’s titanium backup pro apk xda Activators Patch and certainly eleventy-billion times better than dealing with transferring contacts from phone to phone in the age of “dumb phones” it’s not a perfect or complete solution. If you want fine control over your backup process and the ability to backup every application and its associated data, system settings, and more, you’re going to need to rely on a third-party solution. In this tutorial we’ll show you how to backup all data with the powerful and popular Android backup app Titanium Backup.
What You’ll Need
For this tutorial you’ll only need two things
Why a rooted phone? Rooting an Android phone simply means modifying your phone so that applications can have root (administrator) access to the Android operating system. Titanium Backup requires root access to Android in order to effectively backup every aspect of the system. If Titanium Backup did not have root access it would not be able to access systems files to backup system data and it would not be able to access restricted applications in order to copy the application itself and (sometimes) the data for backup.
Phone-by-phone rooting instructions are beyond the scope of this tutorial but don’t worry. If your phone isn’t rooted already there are some titanium backup pro apk xda Activators Patch resources available to help you root. One of the best resources around is the XDA Development forums, titanium backup pro apk xda Activators Patch. Search for your specific phone/carrier for detailed guides on how to root your device. In the process you’ll learn more about your phone than you ever thought possible. Avoid simply searching Google for a rooting guide as many guides are outdated and will lead to big headaches—XDA’s forum posts and guides are frequently updated and it’s easy to make sure you’re looking at a current version.
Finally, a word on Titanium Backup. It comes in two flavors: free and premium ($6.56). We’ll be using the free version for this tutorial; it’s a more than adequate program loaded with great features. The premium version adds in some additional features power users may find useful like versioned backup, backup encryption, unlimited backup scheduling, and such. You can compare the free and premium features here.
Installing Titanium Backup
If your phone is rooted and Superuser is installed, installing Titanium Backup is a breeze. If you’ve skipped the rooting process and/or installing Superuser, jump back to the previous section and check out the XDA forum to read more about your device. If you’ve done the prep work grab a copy of Titanium Backup from the Android Market and install it.
There’s only two things you really need to pay attention to during the installation process to make sure your future Titanium Backup use goes smoothly. First, you’ll get an initial prompt to elevate Titanium Backup’s user privileges. If you’re going to be using the schedule feature for automated backups (and you should be using that feature) you’ll want to check the Remember box here so that Titanium Backup doesn’t need your attention every time it goes to backup. Second, if you haven’t enabled installation of application files from unknown sources (which Titanium Backup needs in order to restore your apps from backup later) make sure to enable it.
Now that Titanium Backup in installed a small caution is in order. Do not just start clicking willy nilly around menus. Titanium Backup is a powerful application designed for power users. Unlike nearly every other application on your phone where it’s hard to even make an error let alone a really serious one, Titanium Backup gives you direct access to your system in a way that makes it significantly easier to send a wrecking ball through the guts of your phone. Read every item twice before clicking it and when you have even the slightest bit of doubt about what a function does, refer to the detailed Titanium Backup wiki for clarification before proceeding.
Performing Your First Backup
Once Titanium Backup in installed and you’ve repeated “I will not click on buttons that perform unfamiliar tasks!” three times, you’re ready for your first backup. Click on the Backup/Restore tab. Click the Menu button on your phone. From the menu that pops up at the bottom of the screen select Batch. From the large Batch menu select [RUN] Backup all user apps + system data. You can opt to only backup user apps or system data by themselves, but we installed Titanium Backup so we could do fast and total backups of our entire system and we suggest you do the same—it’s no fun to find out one data catastrophe too late that the thing you really wanted backed up wasn’t.
Once you select your backup roster, you’ll be prompted one more time. Titanium Backup wants to know if you want to kill the active apps or exclude them. You can also choose not to include certain applications in the backup. Since we have nothing pressing going on in any of our active applications we opted to Kill active apps and left all applications checked. Comprehensive backup is where it’s at, titanium backup pro apk xda Activators Patch. When you’re done with the batch selection menu click Run the batch operation.
Depending on the processing power of your phone and the number of applications you have installed the initial backup process can take anywhere between a minute or two to a quarter hour or more. Plug your phone in to charge and leave it be until it’s done. When’s complete you’ll see the Backup/Restore menu again. Now instead of a bunch of caution triangles beside each application (the not-backed up indicator) you’ll see a variety of smiley faces and check marks. If you’re curious what each smiley face and other marks means, click the Menu button and then click Legend to get a run down, titanium backup pro apk xda Activators Patch. If you see all red/M, yellow/M smileys, and check marks, everything was backed up as intended. If Driver Easy Pro Free Activate see caution triangles mixed in there it’s time to run the batch again—unless the missing backups are the apps you didn’t want to kill and/or excluded from the batch list.
If everything looks good, what now? Navigate to /TitaniumBackup/ on your SD card; there you’ll find all your backups. Copy the entire directory to your computer for safekeeping, sync it to your cloud storage, or otherwise back it up. Titanium Backup is only worth as much as the backups you keep. No backups after a catastrophic data lose (that may or may not have taken your SD card with it), no restoration points to work with.
That’s it! Your first backup is complete! From here you can Schedules tab and schedule a weekly backup (upgrade to Pro to enjoy a more flexible and unlimited scheduling system). You can also tap on an individual app in the Backup/Restore list at any time titanium backup pro apk xda Activators Patch perform an immediate and one-off backup.
Restoring a Backup
When it comes time to restore there are several options. Just like you can batch backup everything on your phone you can also batch restore everything. Navigate to the batch menu you as you did above by going to Menu-> Batch while on the Backup/Restore screen. Scroll down until you see the Restore subheading. There you can select the option that suits your batch restoration needs just as you did for your batch backup needs—see the first two panels of the above image.
A less drastic approach, let’s say you just want to restore your Angry Birds unlocked levels that have gone missing in action, is to tap on an individual application in the Backup/Restore list and click Restore—see the last panel above the above image.
In 99% of the situations restoration is a snap. For the more complicated restoration procedures like restoring data easeus data recovery wizard professional 12.0 crack you’ve updated your phone with a custom ROM or migrated to a new phone make sure to check out the Titanium Backup wiki for pointers.
Have a question? You’re a long time Titanium Backup user with tips to share? Sound off in the comments.
Rooting
Daytona
Questions? ask here
Droid X2 Support
INFO 2.2.2/ 1.2.1482.3.3/1.3.2322.3.4/1.3.3802.3.5/1.3.418
All OTA updates zips NA2.3.3/1.3.2322.3.4/1.3.3802.3.5/1.3.418
SBF (firmware)2.2.2/ 1.2.1482.3.3/1.3.2322.3.4/1.3.380 2.3.5/1.3.418
Android version:2.3.5
Baseband version:N_03.13.31P
Kernel version: 2.6.32.9-00008-gc406305 hudsoncm@il93lnxdroid80
2.3.5 about phone screenshot
2.3.4 about phone screenshot
Quick Links
General
Websites/ Forums
Concepts & Vocabulary
Verify that your download is complete with MD5/SHA-1 Hash Checksums
[How To] Use ADB
backing up contacts/ contacts not syncing
APN Settings
Apps
General Droid X2
Motorola DROID X2 specs
[HOW-TO]- VIDEOS for Droid X2by Tomsgt123
Can’t text, sync, or download anything from the play store
Stock Rom
moto driversMotorola_End_User_Driver_Installation_5.9.0
Intalling drivers/ Driver issues
sbfs (Firmware)
all-in-one ezSBF DX2 2.3.4 with zergrush root option /Dev-Host mirror
How To Flash a SBF/ (stock rom) Using RSD Lite
Rooting
[How To] Root 2.3.5/1.3.418 Magic MD5 Method
Before Rooting
Root with.
After Rooting
Installing V6 Supercharger on Motorola running Gingerbread Rom
Custom Roms
before you install custom rom
List of Gapps Links
Repair
Archive
Before Rooting you should
1. Cyberlink powerdirector 15 free download 64-bit full version SBF files (a or b )
a. all-in-one ezSBF DX2 2.3.4
b. files from How To Flash a SBF/ stock rom Using RSD Lite
2 buy (a or b)
a. Spare Battery Charger for Motorola Droid X/X2ebay linklink 2
b. Motorola Programing Adaptor by Team Black HatMake your own
Root for
2.3.4
Google DrivePete’s Root Tools for rooting 2.3.3 & 2.3.4
XDA[GUIDE]HowTo: Root your Motorola Droid X2 using zergrush (2.3.4)
DroidForumall-in-one ezSBF DX2 2.3.4 with zergrush root option
don’t use zergrush, if you want to update to 2.3.5, or you will have to sbf first.
2.3.5
[How To] Root 2.3.5/1.3.418 Magic MD5 MethodXDADFDXRWPDAS
After Rooting
1. Install Droid X2 BSR/System Recovery or Install BSR or [video] How to use bootstrap recovery
2. backup user data (recommended)
a. backup apps with titanium backup, or rom toolbox
Open Titanium Backup and press the "Options" hard-key. Then press "Batch." Run the Backup all User Apps tool and wait for the process to complete.
b. backup texts and call log with sms backup +
c. verify thatcontacts are backed up/ synced
d. NandroidHowTo: Perform a bootstrap (or nandroid) backup and recovery of X2
Install BSR and make a Nandroid backup
XDA [GUIDE][REF] BLOAT REMOVAL/INSTRUCTIONS UPDATED 8/4/11
XDA [GUIDE]HowTo: Perform a bootstrap (or nandroid) backup and recovery of X2
Droid X ForumsInstall BSR and make a Nandroid backup
XDA [MOD]Droid X2 BSR/System Recovery + InstructionAPK:Mirror 1Mirror 2Mirror 3
You Tube[Video]How to use bootstrap recovery
Google DrivePatched BSR for CM7 cm9 cm10.
XDA [MOD][RECOVERY]- ReRecovery for a safer Bootstrap
You Tube[Video]How to use Z ReRecovery to save you from a Sbf
XDA[GUIDE]Jelly Bean's Google Now for ICS (FULLY FUNCTIONAL!!)
XDA[GUIDE][MOD]GingerBread Battery Fix v0.8( Peppermint battery fix)
DroidForum3GTurboCharger, V6 Supercharger And 98KickAssKernelTweaks By Zeppelinrox
XDA[GUIDE][Mod]Search button as Camera button (key remapping)
XDA[INFO]Help home key and back key flipped
XDA[GUIDE][Project Cheesecake] Need YOUR help!
XDA [GUIDE][GUIDE] V6 Supercharger Cm9 (Updated 07/18/2012
XDA [GUIDE][CM9] Modified services.jar for V6 Supercharger
PD [GUIDE]How to flash Verizon's Droid X2 to Cricket
XDA[LIST]All Droid X2 SBFs and OTA updates
DroidForumall-in-one ezSBF DX2 2.3.4 with zergrush root option
Google DriveHow To Flash a SBF Using RSD Lite
XDA[GUIDE]How to: sbf on linux (and now OSX!written for X2
xda-developersDroid X2 CDT Table
Failed to boot 1 - bootloader/microboot partition problem
Failed to boot 2 - boot partition problem
Failed to boot 3 - recovery partition problem
Failed to boot 4 - system partition problem
Will remain on Gingerbread (Android 2.3).
Eligible for the Motorola trade-up program.
Go tomotorola.com/tradeupto participate
Spare Battery Charger for Motorola Droid X/X2
$10 Motorola Programing Adaptor by Team Black Hat
So you flashed your phone and now it thinks the battery is dead (even though it's not) and it won't let you flash it again to fix it? Or, your battery really is dead and you don't have a way to charge it because your phone is soft-bricked and won't charge the battery. What do you do? With this cable you don't even need a battery in your phone. This isour clone of what is generally referred to as a Motorola "Factory Cable". orHow to make your own Motorola "Factory Cable" orHow/why to make your own Motorola "Factory Cable"
Motorola DROID X2 specs
Motorola DROID X2 - Full phone specifications - GSM Arena
Safe Mode - Motorola DROID X2 MB870
USB Debugging Mode - Motorola DROID X2 MB870
Hard Reset - Motorola DROID X2 MB870 - Verizon Wireless Support
Data Wipe in Android Recovery - Verizon Wireless Support
Memory Card Formatting - Autodesk 3ds max serial number and product key DROID X2 MB870
XDA [GUIDE] to skip activation, use 4 corners method orBoot Android {No BP}
RootJunkyHow to Bypass Motorola Droid X2 activationby Tomsgt123
LJ [GUIDE]Booting Droid X2 into stock android Recovery Mode
xda-developersDroid X2 on pageplus.
MotoMoto X2 page
M [GUIDE]Motorola Verizon Droid X2 User Guide
DX [GUIDE] Common X2 Questions and Answers
RW [INFO]Droid X2 Boot commands
DroidForumSBF File, RSD Lite/Drivers And Instructions Froyo And Gingerbread
XDA [GUIDE] [REF] ROMs, Utilities, Tutorials, Mods (Updated 6-23-2012)
XDA [GUIDE] [REF] Roms, Root, SBF, RSD, Bootstrap, Mods
XDA [VIDEO]How to video's. sbf, root, nandroid backup, and restore
Tomsgt123’s youtube videos
RootJunky[HOW-TO]- VIDEOS for Droid X2by Tomsgt123
XDA[INFO]Class 6 vs. Class 10 SDHC Replacement for Droid X²
1. Root with
2. Install Droid X2 BSR/System Recovery or follow Install Bootstrap
3. Backup user data (user data is wiped from before installing a rom)
a. backup apps with titanium backup, or rom toolbox
press the "Options" hard-key. Then press "Batch." Run the "Backup all User Apps" tool and wait for the process to complete. - clothednblack
b. backup texts and call log with sms backup + or other app
c. verify thatcontacts are backed up/ synced
d. Bookmark Backup
e. Make a Nandroid HowTo: Perform a bootstrap (or nandroid) backup and recovery of X2
4. fully charged battery
5. Install rom with BSR [Video] How to install a custome rom with bsr
6. (optional) [RECOVERY]- ReRecovery for a safer Bootstrap[Video] How to use Z ReRecovery to save you from a Sbf
MOTODX2_Bootstrap_signed.rar (for stock or eclipse rom)
Patched BSR APK for CM7/Cm9/Cm10….
MOTODX2_Bootstrap-CM7-signed.apk-Dev Host
http://www.mediafire.com/?kdtwk653xudkkag
Installing MOTODX2_Bootstrap-CM7-signed.apk
drag and drop apk file the phone
then put phone in Charge Only or disconnect from pc
on phone check allow unknown sources
Menu > Settings > Applications > Unknown sources
open phone's file manager app
navigate to file with phone’s file manager, tap on it, select install
XDA[post]Concise guide to getting CWM working with cm10 A3
Droid X ForumsDroid X2 ROMS
XDA[forum]DX2 Roms
XDA [VIDEO]Different rom videos to see what they look like and some features in them
Gingerbread Roms
Droid X Forums[ROM] Eclipse v2.3
DroidForumEclipse v2.3 (7/25/12)
XDA[ROM][ROM] Eclipse v2.3 (7/25/12)
Dev-Host downloadX2-Eclipse-v2.3.zip
Description: last release 7/25/2012
Dev-Host download X2-Eclipse-v2.2.zip
Description:released 5/8/12 seehttp://forum.xda-developers.com/showthread.php?t=1198857
Dev-Host download X2-Eclipse-v2.1.zip
Description: released 2/27/12, need to sbf to 2.3.4, then install 2.3.5/1.3.412 leaked update, before installing this eclipse version SlimBrowser Offline Installer http://forum.xda-developers.com/showthread.php?t=1198857
DB[ROM] X2-Eclipse-v1.3.zip (flash on 2.3.4) Mediafire Link
137mb Md5 checksum: DA934AF98542D5C66F883C6EAEC52DB9
XDA[ROM]CyanogenMod 7.2.0-RC1 X2 [BETA] - xda-developers(7.1 Gaaps)
Dev-HostCyanogenMod 7.2.0-RC1 X2 [BETA] (Mirror)
Dev-HostMOTODX2_Bootstrap-CM7-signed.apk Patched BSR APK for CM7
XDA[ROM]CM7DX2 WIFI and Dialer fix/mod (enable cron scheduler)!
use gapps-jb-20121011-signed.zip
CM10 Alpha 3 for DX2 mirror
cm-10-20130113-UNOFFICIAL-daytona.zip 149.0 MB
https://mega.co.nz/#!ZRpQQYhS!VKji1TT1PS9EmRCjyHRgMnGCf89VqN1oJkOuxtCNNSk
MD5 Sum: 4ee3969a9f09117f661742470aaba379
XDA[post]Concise guide to getting CWM working with cm10 A3
Google DriveList of Gapps (Google apps)
-----------------------------------------------------------------------------------------------------------------
Nandroid use following Restore Procedure
MF[ROM] Nandroid of Eclipse 2.3 for DX2/(2.3.5)
129mb Md5 checksum: 2B145CD8C90DE8F6ED6EB409F97
--------------------------------------------------------------------------------------------------------------------
RU[GUIDE]How To Fix Motorola Droid X2 Screen
RU[GUIDE]Motorola Droid X2 Repair Guide
XDA[GUIDE]erroronly get the phone to go into fastboot mode
DX[info] ERR: hardware/tegra/prebuild/make/././core/system/rdl/rdl_main .c:
XDA[INFO]Uploading RDL03 failed 00080000/00300000 !! failed"
XDA[INFO]Need to wipe my phone a new way, titanium backup pro apk xda Activators Patch, I think.
XDA[INFO]errror"E:Can't chown/mod /system/.Installation aborted"
It probably happened to you too.
[Off-Topic] the end of an era please lock immediately
[video] How to SBF the Droid X2 2.3.4 ginger bread (back to stock)
1. Download RSD Lite 5.7 or newer RSD Lite mirrors unzip with 7zip
2. Download your recovery firmware image (.sbf)
Verify that your download is complete with MD5/SHA-1 Hash Checksums
3. Install RSD Lite
4. Install moto driversMotorola_End_User_Driver_Installation_5.9.0 or better
see Driver issues
5. Open RSD Lite
select your recovery firmware click on “.” (top middle, see pics below.)
6. Boot moto device to RSD support (bootloader) from http://forum.xda-developers.com/showthread.php?t=1317707
a. Turn off your phone.
b. While your computer is booting back up, power up your phone by pressing and holding the VOLUME UP BUTTON and then pressing the POWER BUTTON until you see the wordsSTARTING RSD PROTOCOL SUPPORT (in white) at the top of the DX2’s screen. This should only take about 3-5 seconds.
Can’t boot to rsd protocol support?
connect to pc via usb
select Start
also see
DX[GUIDE] How to SBF an X2
XDA [GUIDE]HowTo: Perform a SBF ("factory restore") of your Motorola Droid X2
Wiping Data:
before (or after) flashing sbf, Data Wipe in Android Recovery is recommended
if phone bootloops you have no choice, but to wipe data
Notice: if you disconnect phone from pc, before phone has finished rebooting, and then try to close rsd lite, titanium backup pro apk xda Activators Patch, you may get a warning from rsd lite, about damaging your device
don’t worry about it phone will be fine, as long as phone boots successfully.
How to Wipe Data (DX2) fromhttp://forum.xda-developers.com/showthread.php?t=1317707
wipe data before or after flashing SBF
17. Whether or not your phone boot loops at this time, I HIGHLY recommend performing a factory reset from the Android Recovery menu. This is also the process of titanium backup pro apk xda Activators Patch the boot loop.
a. Pull the battery.
b. Plug the battery back in.
c. Power up your phone by pressing and holding the VOLUME DOWN BUTTON and then pressing the POWER BUTTON until you see the words FASTBOOT (in white) at the top of the DX2’s screen. This should only take about 3-5 seconds.
d. Press the VOLUME DOWN BUTTON 7 times, or until you see the words ANDROID RECOVERY.
e. Press the VOLUME UP BUTTON and the screen will add “Entering Android Recovery” under the words ANDROID RECOVERY.
f. In about 5-7 seconds, you should see a white triangle with a yellow exclamation point in the middle and a little android down and to the right of the triangle.
g. Press both volume buttons at once.
h. The Android system recovery utility (second line of text) will come up.
i. Press the VOLUME DOWN BUTTON until “wipe data/factory reset” is highlighted.
j. Press the power button to start the process.
k. Once the wipe data/factory reset process has completed, press the VOLUME UP BUTTON until reboot is highlighted.
l. Press the power button to reboot your DX2.
Activation and skipping activation:
if phone reboots to activation screen, touch android to activate or if you do not wish to activate with verizon, use four corners activation skip or Boot Android {No BP}
Activating
if phone does not boot to activation screen, it may be necessary to dial *228+ to reconnect to verizon
DF [INFO]can not activate phone/ no dial pad on *228/
XDA [INFO]No keypad during activation work titanium backup pro apk xda Activators Patch (dial *228+)
Dial *22891 to update the PRL or *22899 to program the phone and update the PRL both
if rsd Lite is not working correctly try running as administrator,
and/or disabling virus protection
Quote: fromhttp://droid.koumakan.jp/wiki/SBF
Note: Under certain circumstances (especially when using Windows Vista and Windows 7) there might be a problem with not all device drivers being installed correctly. In such case, the flashing process will abort, and your phone won't be able to boot normally. RSDLite shows the following error message: Error switching phone to BP Pass through mode To get around this issue, once you get a Device driver could not be installed message from Windows, don't close RSDLite nor power off the phone. Start Motorola Driver Installer once again, and let it finish. Then if RSDLite didn't timeout yet, head to Device Manager, find the Unknown device, and in its properties' Driver tab click Update driver…. It should now install normally. If RSDLite timed out and you got an error from it, just repeat the SBF process. The driver should now be present, and the flashing process will finish normally. |
Driver issues
if driver is not installed correctly, when phone is connected and in rsd support,
start>control panel>hardware sound>devices & printers>device manager
may look like this
if driver is correct should look like
Once you get a Device driver could not be installed message from Windows. .Start Motorola Driver Installer once again, and let it finish. Then . head to Device Manager, find the Unknown device, and in its properties' Driver tab click Update driver…. It should now install normally.
may need to reboot pc-fromhttp://droid.koumakan.jp/wiki/SBF
if that does not work
download this file
Moto Drivers Drivers win 7 64bit.rar
unzip, and copy to C:\Program Files\Common Files\Motorola Shared\Mobile Drivers\Drivers
also see
YouTubeDevice Drivers Install-Tomsgt123
CNET.comUSBDeview for troubleshooting faulty USB device drivers
moto driversMotorola_End_User_Driver_Installation_5.9.0
Moto[TOOL]MOTOROLA DEVICE (Drivers) MANAGER
--------------------------------------------------------------------------------------------------------------------------
2.3.5 about phone
2.3.4 about phone
-------------------------------------------------------------------------------------------------------------------------------------------
Sources
.sbf files (see How To Flash a SBF Using RSD Lite
Titanium Backup (root needed)
About this app
☆Needs ROOT, Android 1.5-10+ (ARM,x86,MIPS)
☆Over 25 million users, 32+ languages.
☆PRO Key is available on Play Store!
☆Voted #1 TOP ROOT APP on Twitter.
☆Problem? See titaniumtrack.com/kb
☆Scroll down for more info & DEMO VIDEOS ;-)
☆ ☆ ☆
Titanium Backup is the most powerful backup tool on Android, and then some.
You can backup, restore, freeze (with Pro) your apps + data + Market links. This includes all protected apps & system apps, plus external data on your SD card. You can do 0-click batch & scheduled backups. Backups will operate without closing any apps (with Pro). You can move any app (or app data) to/from the SD card. You can browse any app's data and even query the Market to see detailed information about the app.
Also see the paid PRO key which adds EVEN MORE awesome features such as:
[✔] 0-click batch restores
[✔] Keep multiple backups per app
[✔] Backup/restore SMS,MMS,calls,bookmarks,Wi-Fi AP as XML
[✔] Multi-user app data
[✔] Apps freezer
[✔] Sync to/from Dropbox (manual/scheduled)
[✔] Sync to/from Box (manual/scheduled)
[✔] Sync to/from Google Drive (manual/scheduled)
[✔] TB Web Server: download/upload your backups as a single ZIP on your computer
[✔] Convert user apps <=> system apps
[✔] Integrate system app updates into Microsoft office 2016 professional plus Encryption
[✔] Market Doctor (relink apps to Market)
[✔] "Destroy all Market links" feature
[✔] Hypershell speed
[✔] Backup apps without closing them!
[✔] Create your own update.zip containing apps+data!
[✔] Restore individual apps+data from non-root ADB backups!
[✔] Restore individual apps+data from CWM backups!
[✔] Restore individual apps+data from TWRP backups!
[✔] Market "auto updating" manager
[✔] System logs cleaner
[✔] Dalvik cache cleaner
[✔] Integrate Dalvik cache system elements into ROM
[✔] Unlimited schedules
[✔] Load/Save a Filter and use it in Widgets/Schedules
[✔] Change the device's Android ID, restore it from a backup or after a factory reset
[✔] Protect backup against deletion
[✔] Send backup (to e-mail/cloud) and import it in 1 click
[✔] Backup→Verify→Un-install an app in one shot
[✔] Freeze/defrost/launch apps in a single click
[✔] CSV export any app DB (e-mail or Google Docs)
[✔] Convert app data to/from fast WAL format
[✔] WAY MORE!
Check out this in-depth review of TB PRO:
http://youtube.com/watch?v=vuvDTS9RDrM&hd=1
And check out the new TB PRO demo video:
http://youtube.com/watch?v=YU33zabluSY&hd=1
Here's the older TB demo video:
http://youtube.com/watch?v=pZdqITHxCsM&hd=1
More info on permissions:
• "Internet" is used to access Market,Dropbox,ChangeLog.
• "Accounts" is used to access Market.
Some advice:
• We recommend to avoid "modified" TB versions because they can cause various problems down the road.
5 Simple Fixes for Common Google Play Store Problems
When the Google Play Store crashes, it sometimes gives you an error code. While searching the internet for each code helps, oftentimes it's not necessary. Most Play Store problems require one of five basic fixes.
The Basics of Fixing Google Play Store Problems
There are five different fixes for repairing download vsdc video editor full crack Play Store errors, titanium backup pro apk xda Activators Patch. You don't need to use all of these; try the first one and see if it fixes the problem. If it doesn't, titanium backup pro apk xda Activators Patch to the next.
The five fixes are:
- Stop the app and then wipe the Store's cache and/or data.
- Switch from a data connection to Wi-Fi.
- Uninstall updates to the Play Store and update it again.
- Refresh your Google account. titanium backup pro apk xda Activators Patch Register your device with Google.
Walking through these steps will resolve the majority of Play Store problems. However, we will cover some common error codes that these methods won't fix later.
Why Modifying Android Causes Google Play Store Failures
This discussion does not cover rooted devices or those running a custom ROM. These processes change Android's system files and thus introduce too many variables to diagnose. These changes can stop the Play Store from functioning.
That's a big reason why installing custom ROMs or restoring from a backup using a custom recovery sometimes prevents the Store from working. We advise using Titanium Backup, or a similar backup solution, to restore apps with data.
Don't get me wrong; there are a lot of reasons to install a custom ROM. Unfortunately, when something goes wrong (as it often does), troubleshooting requires greater experience and effort than on an unmodified device.
1. Stop App, Wipe Cache and Data
The Google Play Store relies on other processes that run silently in the background. Whenever you wipe the Play Titanium backup pro apk xda Activators Patch, it's also a good idea to do the same with Google Play services titanium backup pro apk xda Activators Patch Google Services Framework---we've looked at updating Google Play services if you want to try that first.
Optionally, you titanium backup pro apk xda Activators Patch also want to wipe data for Download Manager.
Once wiped, restart your device and then reattempt the installation or update. This may require reentering your login information. Here's a step-by-step rundown (the process may vary slightly depending on your device and Android version):
First, go to Settings, titanium backup pro apk xda Activators Patch. Then navigate to Apps and find the tab for All. (On Android 9 Pie, choose Apps & notifications > See all X apps.)
2 Images
Here, choose Google Play Store. Select Force Stop, which will kill the app's process. After this, tap Storage to get more options. On the resulting screen, tap Clear Cache to remove temporary data and hopefully fix the problem.
If it doesn't, you can try Clear Data. This also wipes the cache, but essentially resets the app to its original form. This means you may need to log back in and configure preferences again.
2 Images
If the above process doesn't fix your issue, try repeating it for Google Play services, titanium backup pro apk xda Activators Patch, Google Services Framework, and Download Manager. Note that you'll need to tap the three-dot Menu button at the top-right of the All apps screen and toggle Show system to see the latter two entries.
We've looked more closely at the "Unfortunately Google Play Services has stopped" error if you're having issues with that specifically.
2, titanium backup pro apk xda Activators Patch. Switch From Data to Wi-Fi
A lot of apps won't install if you're on an unreliable internet connection, which is a common issue with mobile data.
To switch from mobile data to Wi-Fi, drag down from the top of your screen with two fingers to open Quick Settings. Press and hold on the Wi-Fi icon to open its settings, where you can find a list of nearby networks. If there aren't any suitable ones nearby, wait until you're back on your home network.
It's possible to have the opposite problem as well. When you have problems installing an app over a Wi-Fi network, try switching to mobile data and reattempt installation. If it works, it may require that you diagnose an issue on your network.
Finally, you should also disable your VPN, if you use one. A VPN can cause issues with Play Store downloads.
3. Uninstall and Reinstall the Play Store App
On a rooted device, you can uninstall the Play Store app and reinstall it again from scratch. But even on a non-rooted device, you can take a similar troubleshooting step.
To do this, open Settings > Apps & notifications > See all X apps. Select Google Play Store from the list. On its page, tap the three-dot Menu button and choose Uninstall updates. This will revert the Play Store app to its original version.
Once you've done this, you can update to the latest version of the Play Store in two ways. One is simply opening the Play Store and selecting Settings from the left slide-out menu. Here, scroll down and tap the Play Store version entry to check for updates.
2 Images
Alternatively, you can grab a copy of the Play Store APK from APKMirror and sideload it to force the update. See below for more info on sideloading.
4. Refresh Your Google Account
Refreshing (removing and re-adding) your Google Account isn't too hard. Be warned: Doing this will remove data from your device that's synced with your Google account. This could include messages, photos, contacts, and more.
First, go to Settings > Accounts. Select the Google account that's experiencing issues. If multiple accounts suffer from the problem, you remove them all. On Android Pie, you can simply tap Remove account to erase it. On older versions, tap the three-dot Menu button and choose Remove account.
2 Images
You can then add your account back from the Accounts menu. It's not a bad idea to restart your phone after re-adding your account.
5. Register Your Device With Google
In 2018, Google cracked down on unlicensed Android devices. These are phones and tablets from no-name brands that failed to pay the licensing fees for the Android operating system. In most cases, Google completely stops the Play Store from working, titanium backup pro apk xda Activators Patch. In other cases, the Play Store won't run any Google-branded apps, like Gmail or Google Maps.
You might see Error Code 501 or a warning that you own an unlicensed device. In other cases, you might not receive any error message or warning at all. Fortunately, Google now allows unlicensed devices access to the Play Store. But there's a catch: you need to register the device with Google. The process is easy.
How to Register Your Android Device With Google
First, download and install the app Device ID to get easy access to your phone's information. If you can't access the Play Store, try sideloading the app from APKMirror. Once installed, copy the Google Service Framework number.
Second, now that you have the number copied to your clipboard, go to Google's device registration site. Here, you'll need to log into your Google account. Once logged in, long-press the text input box for Google Services Framework Android ID and paste the number copied from the app Then hit the Register button.
Restart your device. Once it reboots, you should be able to either update the Google Play Store or download apps again as normal.
Other Google Play Store Error Codes and Fixes
One XDA user has compiled a mammoth list of Play Store error codes containing roughly 20 common issues. Most require you to perform the actions listed above (cache wipe and similar), although a few are exceptions to this rule.
These exceptions are:
- Error 498: In this case, your phone's cache is full. Try wiping the cache partition using your phone's recovery.
- Error 919: Your phone's storage is full. You'll need to free up space on your device in order to continue.
- Error 403: You're using two different Google accounts on the same device. You'll need to use the correct account; consider removing the other one.
- Error 927: The Play Store is already updating, so there's no reason to troubleshoot this issue. Just wait until it finishes updating.
- Error 101: You have too many apps installed. Try removing a few.
- Error 919: Your Access Point Name settings aren't correct. This requires getting the correct APN settings and reconfiguring your device.
Apps to Diagnose Play Store Issues
One of the best resources for these issues is the app Error Titanium backup pro apk xda Activators Patch & Fixes, which combines the knowledge of AndroidPIT's users and editors on resolving Android error codes. The app is designed as a reference utility and includes both Android error codes and Play Store error codes. Input the code you see and the app displays potential fixes.
On the downside, the password depot 12 crack displays full-screen ads. While ads are a small price to pay for resolving a device-disabling bug, you might prefer to search Google for your particular error code, if you haven't solved it yet.
If all else fails, you can always try the Amazon App Store or F-Droid. Both install on pretty much any device and run into fewer problems than Google's Play Store.
Resolving Google Play Store Issues
Fixing Play Store problems isn't impossible. If the basic troubleshooting methods (like wiping the Play Store's WebStorm 2019.1.3 Crack Product key and data) fail, you can always look up your particular error code and solve almost any problem---unless you've installed a custom ROM, that is.
Fortunately, you can try manually installing Google Apps. This works for both custom ROMs and in cases where you don't have the Play Store installed by default.
Keep in mind that you might encounter certain Play Store problems, such as blocked apps, if you have relocated. In such cases, updating the country/region setting in Google Play Store can fix the problem!
 ';} ?>
0 Comments